
Alright, let’s get real – JavaScript can be a bit of a headache sometimes. But with ES6, it’s a whole new ball game.
ECMAScript 6, also known as ES6, is a major update to the JavaScript language that introduced many new features and syntax improvements to make JS code more concise, readable, and efficient 🤩
In this blog post, we’ll explore some of the most useful and common ES6 features that you can start using in your projects today.
From arrow functions to template literals, let’s dive into the world of modern JavaScript!
Hey! This isn’t an in-depth guide of ES6 features – it’s not meant to be. Take this post as a short and sweet refresher that’ll get you up and running with ES6 😛
1) Template literals
Template literals provide an easy way to concatenate strings through a cleaner syntax.
So instead of doing this:
"The injected JS is " + firstVar + " and even more right here " + secondVar + " ."
We can now do this:
`The injected JS is ${firstVar} and even more right here ${secondVar}.`
I mean who doesn’t appreciate the beauty above 🥲
For template literals, you need to focus on two things:
- backticks wrapping the string
- wrapping of JS expressions and/or variables within
${...}.
We no longer need \n for multi-line strings nor those plus signs or, my nemesis, the darn spaces between words!
For more template literals in action see How To Build An Interactive Menu Component.
2) Destructuring
Destructuring is a special syntax that allows us to “unpack” elements from arrays and objects.
Objects
Reference the values of the extracted properties by the destructured keys instead of object.key or object["key"] .
Example:const { apple, pear, banana } = { apple: "red", pear: "green", banana: "yellow" }
To get the colors from the sample object above (right-hand side), we can reference the newly created variables apple, pear , and banana (left-hand side).
For nested objects, follow the structure of the object like so: const { key: { key } } = object .
Example:
const myFruits = {
    fruits: {
        apple: "red",
        pear: "green",
        banana: "yellow"
    }
}

// Get colors of fruits
const { fruits: { apple, pear, banana } } = myFruits;
console.log(apple, pear, banana) // "red" "green" "yellow"
Arrays
Like with object destructuring, reference the array items by the destructured variables.
Example: let [ item1, item2, item3 ] = array
The order of the destructured items goes by index so the value of item1 will be that at array[0] and so forth.
Now, let’s pull the BTS array used in Introducing 4 Different Types Of JavaScript Loops With Examples.
const BTS = [
  'Jung Kook',
  'V',
  'Jimin',
  'SUGA',
  'Jin',
  'RM',
  'j-hope'
];
From the BTS array, I want to extract only my “bias”, RM 😇 I’d like to unpack the list but only pull RM out of it.
How do we skip items when destructuring?
Well, we can easily skip values when destructuring by omitting a variable while still using a comma to account for the index.
Example: let [,,,,, bias,,] = BTS
Console logging bias will yield “RM”, the only value unpacked from the BTS array.
This way we avoid assigning unnecessary variables for unused values!
3) Sets
Use a Set object to create unique lists out of existing ones since a value in a Set may only occur once.
A Set must first be instantiated new Set(<list>) then you can work with available methods to do things like:
- add a value by chaining
add(”your value”)(works only if the value doesn’t already exist) - remove a value by chaining
delete("your value"); returns a boolean if stored in a variable - check if a value exists by chaining
has("value") - clear all elements by chaining
clear()
I’ll use the programming languages list from An Easy Way To Create A Custom Input Dropdown, tweaking it a bit to generate some duplicates.
const codeLangs = [
'Haskell',
'Shell',
'Lua',
'Shell',
'Delphi',
'Groovy',
'Lua'
];

const set = new Set(codeLangs);
console.log(set); // [object Set] (5) {"Haskell","Shell","Lua","Delphi","Groovy"}

set.add('HTML') // [object Set] (6) {"Haskell","Shell","Lua","Delphi","Groovy","HTML"}
set.delete('HTML') // undos previous addition

const check = set.has('HTML') // after deletion
console.log(check); // false

set.clear(); // [object Set] (0) {}
Note: A Set is a special kind of object that’s different from an Array object so if wanting to use array methods, you must first convert into an Array object.
4) Object literals
These are plain old JavaScript objects, nothing fancy.
One thing to note is that you don’t have to repeat key: value if key equals the value.
Example: Say we have let age = 12 and an object that will hold this value by way of the age key. Instead of doing { age: age } opt for { age }.
It’s a matter of choice, but isn’t the second way much cleaner?
This simple example might not do it justice, but take it from someone who’s worked on much broader projects that you’re guaranteed to appreciate simplicity when complexity strikes you on the head 😌
5) Spread operator
The spread operator allows us to make a copy of an array, or object, instead of just referencing the original array or object.
Example: [ ...arrayYouWantToCopy ] or { ...object }
Tip: This is important, especially when working with React and state management!
When you assign an array to a variable, you’re generating a ghost copy.
The variable isn’t an actual clone of the existing array – it’s only pointing to the array – so any changes to the variable will affect the original array.
With the spread operator life gets easier 🙃
6) Rest operator
Okay, not gonna lie rest and spread are literally identical in syntax since both are designated by ... (three dots).
But, they’re different in very specific ways.
Whereas the spread operator allows access to the individual items of an iterable, the rest operator places items in an array and returns the array.
Use cases:
- Get arbitrary arguments out of a function without converting them into an array.
function Name(...nums) { console.log(nums) }

Name("THT", "Sister Klea", "Brother DM");
// ["THT","Sister Klea","Brother DM"]- Extract only the first couple of values from an array, storing the remaining items in their own array.
const BTS = [
  'Jung Kook',
  'V',
  'Jimin',
  'SUGA',
  'Jin',
  'RM',
  'j-hope'
];

let [ first, second, ...rest] = BTS
console.log(first, second, rest) // "Jung Kook", "V", ["Jimin","SUGA","Jin","RM","j-hope"]
7) Arrow functions
A new-ish syntax to define a function without the function keyword.
Example: const name = () => { // do something }
Some things to keep in mind:
- Skip parenthesis if there’s only one parameter, optional
- Skip braces if returning a single thing, ex:
const myName = name => console.log(name) - Short version needs to be on a single line, otherwise, use braces
8) Default params
Sometimes you want to include optional and/or default parameters in your function definitions.
Example: const printMssg = (mssg = 'Nada') => console.log(mssg)
In the example above:
- “Nada” is the default value for
mssgif no argument is passed into the function (say you executeprintMssg()) - A default provides a fallback value for a function with inputs
9) includes()
An array method that returns a boolean value if the item-to-check is found in a list.
Example: myList.includes("item")
I mean, it goes without saying, but it’s good for lists 😏
Tip: The
includes()method doesn’t accept multiple values. If you’ll like to check for more than one value, use a loop like a for-loop.
10) Exports, Imports
The export and import keywords are used in modular scripts designated by type="module" .
- Import:
import { myVariable } from "file" - Export:
export const myVariable = "THT is awesome"- Default export: Uses the
defaultkeyword. The file only exports the default so the import name can be anything. - Named export: The file can have multiple exports with the import name defined by the export.
{ apple }imports an export calledapple{ apple as fruit }imports an export calledappleunder the alias offruit{ * as fruits }imports all exports of a file asfruits
- Default export: Uses the
11) Classes
I like to think of classes as blueprints of something. They define properties and behaviors of that something but don’t actually represent anything physical until instantiated as an object.
class Fruits {
constructor(name, color) {
this.name = name;
this.seeds = true;
this.color = color;
}
static fruit() {
console.log('I am fruit, fruit am I');
}
get isFruit() {
console.log(this.seeds);
}
eat() {
console.log('I really REALLY like fruit');
}
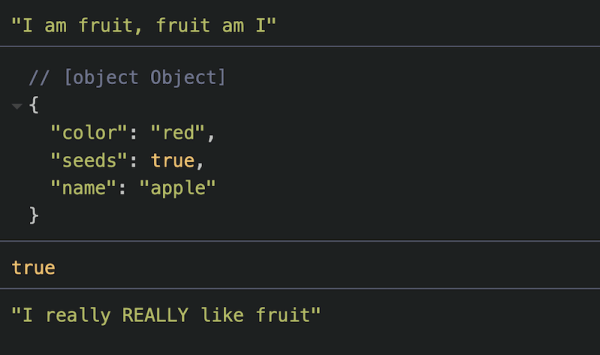
}To access class properties and methods, create an instance, let myFruit = new Fruits('apple', 'red') , then do:
console.log({
  color: myFruit.color,
  seeds: myFruit.seeds,
  name: myFruit.name
});

myFruit.isFruit;
myFruit.eat();
Notice all properties and methods are accessible using the myFruit instance. In turn, myFruit is initialized with a name and color arguments as two properties depend on this customization.
Now, myFruit.isFruit is somewhat special since it uses “get” which binds a property to a function that is called just like any other property (it’s not a method).
Meanwhile, “static” returns something without creating an instance so the “static” function is called on the class itself rather than the instance of the class, Fruits.fruit() .
To inherit properties or methods from another class use the extends keyword:
class Apple extends Fruits {
  constructor() {
    super();
    this.color = 'red';
    this.name = 'apple';
  }

  buy() {
    console.log('I bought an APPLE!');
  }
}

Apple.fruit();

let apple = new Apple();

console.log({
  color: apple.color,
  seeds: apple.seeds,
  name: apple.name
});

apple.isFruit;
apple.eat();
apple.buy();
You need to use super() to call the constructor of the parent class to access its properties and methods.
In the example above, seeds is an inherited property as is the eat() method.
Basically, what we did is copy certain properties and methods, modifying or overriding those inherited properties we don’t need.
Keep in mind, there’s no need for a constructor definition if there are no new properties added to an extended class!
Tip: ES7 syntax simplifies a few things by, for example, allowing us to set class properties directly without an constructor function.
// ES7
class Apple extends Fruits {
  color = 'red';
  name = 'apple';

  buy = () => {
    console.log('I bought an APPLE!');
  }
}

let apple = new Apple();
console.log(apple.color, apple.name, apple.seeds)
apple.buy();
apple.eat();
12) Promises
A Promise is used when fetching data from an API or executing asynchronous actions.
There are three usual statuses: pending, success, and fail.
const myPromise = new Promise((resolve, reject) => {
    setTimeout( ()=> {
        let error = false;
        if(error) {
            reject("Oopsie, there's an error!");
        } else {
            resolve("You're promise passed!");
        }
    }, 3000);
})

myPromise
    .then( success => console.log(success) )
    .catch( error => console.log(error) );
Typically, a promise takes a callback function with two parameters, resolve and reject.
In the example above:
- Construct a Promise()
- Use the
setTimeout()method to simulate an asynchronous delay errorstarts off as false and its status after a 3-second wait determines whether the promise is resolved or rejectedsuccessreturns the resolve message whileerrorreturns the reject message
Tip: The example should always resolve because
erroris always false 🙃
Promises aren’t the easiest of subjects to grasp, though, with practice, you’ll get better at them.
At least, that’s what I keep telling myself after so many encounters and yet so much uncertainty 😬
13) Fetch
The fetch() method is an alternative to XMLHttpRequest when requesting resources from another source.
A fetch request typically follows this skeletal format:
fetch("api endpoint", {options}) // returns a Promise
    .then( response => response.json() ) // maps JSON body
    .then( data => console.log(data) )
Though by no means is the above all-inclusive. Fetch requests can be as simple and as complex as necessary.
In the example, we’re simulating a simple get method route which is the default.
For post or patch and so forth, pass an options object as a second parameter to fetch with properties that specify different settings.
If authorization is necessary, use the appropriate headers in the options object.
14) Async / await
An alternative to the promise chains for asynchronous behavior is async functions.
I prefer async to a promise solely for the much cleaner syntax 💫
Here’s an example of how async / await eliminates the chaining of the previous fetch run.
const apiURL = "URL";

async function getJoke() {
    const resp = await fetch(apiURL);
    const data = await resp.json();
    console.log(data);
}
The example fetches from apiURL , a dummy for an API endpoint, then parses the response body as JSON (really transforming it to a JS object literal).
Both actions of fetching and parsing take time so we use the await keyword.
If await isn’t used, then the code runs line by line drawing errors since the browser gets to the console log step but data is still missing.
Note: The
awaitkeyword must be used within anasyncblock, otherwise, you’ll get errors.
Now, when executing getJoke the fetched data will be displayed in the console. However, if we weren’t console logging data from inside the function but were returning data instead, things look different.
Since a returned value needs to be stored in a variable, we’d do this: const data = getJoke() .
But recall getJoke is an async function that takes time to do something so we need to await it.
Adjusting, now are expression looks like this: const data = await getJoke() . In turn, we need to place this in an async function because await must be used within an async block.
Tip: Instead of creating a whole other async function to work with the result, we could opt for chaining by doing
getJoke().then( ... ).
As a further tip, remember that when working with async / await, or any asynchronous action, the sequence of events on execution is important.
Under the hood, async / await is just a Promise so, even if you opt to use async / await, don’t thoroughly neglect to grasp the fundamentals of Promises!
That’s a wrap y’all. See ya on the next project.
Nägemist ✌️


