
There’s a question that comes up constantly in React interviews, code reviews, and team onboardings: “What’s your preferred React state management approach?”
And if you’re being honest, your current answer might be something like: “Um… useState? Or maybe Redux? I’ve heard of Zustand…” followed by a nervous laugh 😬
That’s a completely reasonable place to be.
The React state management ecosystem has more options than ever in 2026, and the “right” answer changes depending on what you’re building.
It’s not confusing because you’re bad at this, but because no one handed you a map.
This post is the map.
By the end, you’ll know what each major React state management library and pattern does, when to reach for it, and, most importantly, you’ll have a confident, well-reasoned answer the next time someone asks about your preference.
Don’t worry, I’ll provide examples and even reference React state management in a few of my THT projects!
What Is “State” Anyway?
State is any data that describes what your application is doing right now. It’s the “memory” of your app.
When state changes, React re-renders the affected components to reflect those updates automatically.
Here’s a simple mental model 👇
Imagine a light switch. The state is whether the light is on or off.
When you flip the switch (an action), the state changes, and the room (the UI) updates to reflect that.
Some common examples of state in real apps:
- UI state: Is a modal open? Is a button loading? What’s the current value in an input field?
- Server state: What posts did the API return? Is the data still fresh, or do we need to refetch?
- Global preferences: Is the user logged in? Are they using dark mode? What language have they selected?
These feel similar, but they actually have very different needs, and that’s what makes state management complex once your app grows.
We’ll come back to this distinction often.
The Core Problem: Prop Drilling
React uses unidirectional data flow, which is a fancy way of saying that data passes down from parent to child via props.
That’s elegant and predictable when your app is small.
But here’s where it gets painful. Imagine you have a user’s authentication status stored in a top-level component, and you need to display it deep inside a nested component.
Say, a profile icon inside a nav inside a header inside a layout.

You’d have to pass that data through every component in between, even the ones that don’t care about it at all.
That’s prop drilling, and it’s the number one reason people reach for a state management library.
// This is the pain.
// LoginStatus gets passed through three components that don't need it.
<App loginStatus={loginStatus}>
  <Layout loginStatus={loginStatus}>
    <Header loginStatus={loginStatus}>
      <ProfileIcon loginStatus={loginStatus} /> {/* This is the only one that cares */}
    </Header>
  </Layout>
</App>
There’s a better way. Several of them, actually.
Let’s walk through them from simplest to most complex.
Related: How To Master React State & Event Handlers (Part 4)
The React State Management Spectrum
Here’s the key mindset shift for 2026: you don’t pick one state management solution for your whole app. You pick the right layer for each type of problem.
Think of it in levels:
- Local UI State: Simple interactions within a single component
- Shared/Global Client State: Data that needs to live across many components
- Server State: Keeping your client in sync with backend data
Most mature React apps use multiple approaches simultaneously. That’s not a sign of messiness. It’s a sign of good architecture.
Let’s go level by level.
Level 1: Built-In Local State (The Foundations)
These are React’s own built-in hooks, so you don’t need to install anything.
They should be your default until you have a reason to reach further.
useState — The Golden Child
Complexity: Very Low | Install: Nothing | Best for: Simple, independent values
useState is the hook you probably already know and the first you’ll blurt out. It stores a single piece of data and gives you a function to update it.
const [isOpen, setIsOpen] = useState(false);
const [inputValue, setInputValue] = useState('');
const [count, setCount] = useState(0);
That’s it. You have a value and a setter. When you call the setter, React re-renders the component.
When to use it: Reach for useState when:
- The state is only needed in one component (or passed to one child)
- The update logic is simple, like a line or two
- State values are independent of each other (more on this below)
Independent vs Dependent State
Independent means updating one value doesn’t require updating another to keep your UI consistent.
isOpen (modal visibility) and inputValue (a search field) are independent. Toggling the modal has nothing to do with what’s typed in the search box.
Contrast that with a shopping cart, where items and total are dependent. Add an item and you must update both at the same time, or your UI shows the wrong total.
Managing that with two separate useState calls means you’re always one missed setter away from a bug. That’s the signal to reach for useReducer instead.
// A classic toggle is perfect for useState
function Modal() {
  const [isVisible, setIsVisible] = useState(false);
  return (
    <>
      <button onClick={() => setIsVisible(true)}>Open</button>
      {isVisible && (
        <div className="modal">
          <p>Hello!</p>
          <button onClick={() => setIsVisible(false)}>Close</button>
        </div>
      )}
    </>
  );
}
When it starts to struggle: When you have multiple pieces of state that depend on each other, or when update logic becomes complex enough that you’re writing multiple setters at once.
That’s the signal to look at useReducer.
useReducer — The Organized Sibling
Complexity: Low–Moderate | Install: Nothing | Best for: Complex, interrelated state
useReducer is useState‘s more structured cousin. Instead of updating state directly, you dispatch actions—descriptive objects that say what happened—and a reducer function decides how the state should change in response.
So, instead of saying “set the count to 5,” you say “increment happened,” and the reducer will figure out what that means.
// The reducer: a pure function that defines ALL valid state transitions
function cartReducer(state, action) {
  switch (action.type) {
    case 'ADD_ITEM':
      return { ...state, items: [...state.items, action.payload], total: state.total + action.payload.price };
    case 'REMOVE_ITEM':
      return {
        ...state,
        items: state.items.filter(item => item.id !== action.payload.id),
        total: state.total - action.payload.price
      };
    case 'CLEAR_CART':
      return { items: [], total: 0 };
    default:
      return state;
  }
}

// In your component
function ShoppingCart() {
  const [cart, dispatch] = useReducer(cartReducer, { items: [], total: 0 });

  return (
    <div>
      <button onClick={() => dispatch({ type: 'ADD_ITEM', payload: { id: 1, name: 'Hat', price: 29 } })}>
        Add Hat
      </button>
      <p>Total: ${cart.total}</p>
    </div>
  );
}
Notice how the reducer centralizes all the logic for how your cart state can change. That’s the superpower here.
When to use useReducer:
- Multiple state values change together (a shopping cart’s
itemsandtotalshould always update atomically) - You have more than 2-3 related state values
- Update logic is complex enough that it deserves to live in its own function
- You want to make “what can happen to this state” explicit and predictable
When I was learning React, a project I worked on was an E-commerce Product Page and, looking back on it, you can clearly see how I naturally gravitated toward something that resembles useReducer types and actions. This was before I ever used useReducer.
export default function CartAction({item}) {
  const [incDefault, setIncDefault] = useState(0);
  const [incAction, setIncAction] = useState(null);

  return (
    <div className={s.cartActionWrapper}>
      <CartIncrement inc={incDefault} onInc={setIncDefault} onIncAct={setIncAction} />
      <AddToCart item={item} quantity={incDefault} action={incAction} />
    </div>
  );
}
Tip 💁♀️
If you catch yourself writing multipleuseStatesetters in the same event handler just to keep values in sync, that’s a clear sign to consolidate withuseReducer.
Level 2: Sharing State Without Prop Drilling
Context API — The Built-In Solution
Complexity: Low | Install: Nothing | Best for: Infrequently-changing global data
The Context API is React’s built-in answer to prop drilling. It lets you create a “broadcast channel” that any component in your tree can subscribe to without passing props through every layer.
See it in action: How To Make A Fantastic Tic Tac Toe Game With React
Here’s how it works in three steps:
Step 1: Create the context
// ThemeContext.js
import { createContext, useContext, useState } from 'react';

const ThemeContext = createContext(null);
Step 2: Wrap your app (or a subtree) in a Provider
// App.jsx
export function ThemeProvider({ children }) {
  const [theme, setTheme] = useState('light');

  return (
    <ThemeContext.Provider value={{ theme, setTheme }}>
      {children}
    </ThemeContext.Provider>
  );
}
Step 3: Consume it anywhere in the tree
// DeepNestedComponent.jsx — no props needed!
function ThemeToggle() {
  const { theme, setTheme } = useContext(ThemeContext);

  return (
    <button onClick={() => setTheme(theme === 'light' ? 'dark' : 'light')}>
      Current: {theme}
    </button>
  );
}
When to use Context: Use it for data that…
- Changes infrequently (i.e., theme preferences, current user, language settings)
- Needs to be accessible from many different components
- Isn’t performance-critical
On the most recent redesign of my portfolio, I integrated an AI chatbot and implemented a theme toggle using Context that allows users to select between light and dark themes (respecting system preferences).
And in this Shopping Cart project, I show you how to work with Context and useReducer to manage complex state. Check it out!
The Re-render Trap (and Why It Matters)
There’s a behavior with Context that catches a lot of developers off guard, and it’s worth slowing down a little to understand it before you go build something.
Every component that consumes a context re-renders whenever that context’s value changes.
Not just the component that triggered the change, but every single subscriber.
Here’s what that looks like in practice:
// Imagine this context holds a counter that updates every second
const AppContext = createContext(null);

function AppProvider({ children }) {
  const [count, setCount] = useState(0);
  const [theme, setTheme] = useState('light');

  useEffect(() => {
    const id = setInterval(() => setCount(c => c + 1), 1000);
    return () => clearInterval(id);
  }, []);

  return (
    // Every time count changes, ALL consumers re-render—
    // including ThemeToggle, which doesn't even care about count.
    <AppContext.Provider value={{ count, theme, setTheme }}>
      {children}
    </AppContext.Provider>
  );
}

function ThemeToggle() {
  const { theme, setTheme } = useContext(AppContext); // Re-renders every second 😬
  return <button onClick={() => setTheme('dark')}>{theme}</button>;
}

function Counter() {
  const { count } = useContext(AppContext); // Re-renders every second — makes sense
  return <p>{count}</p>;
}
From the example above, ThemeToggle doesn’t use count at all, but it still re-renders every time count changes because they’re in the same context.
In a small app, this is barely noticeable.
In a large component tree with dozens of consumers, it becomes a real performance problem.
You can work around this by splitting contexts (one for theme, one for the counter), but at some point, you’re fighting the tool.
That’s the signal to reach for Zustand or Jotai instead, since they let components subscribe to only the slice of state they actually need.
Note 📍
For data that rarely changes—theme, auth session, language—Context is perfectly fine. The re-render issue only bites you when the context value updates frequently.
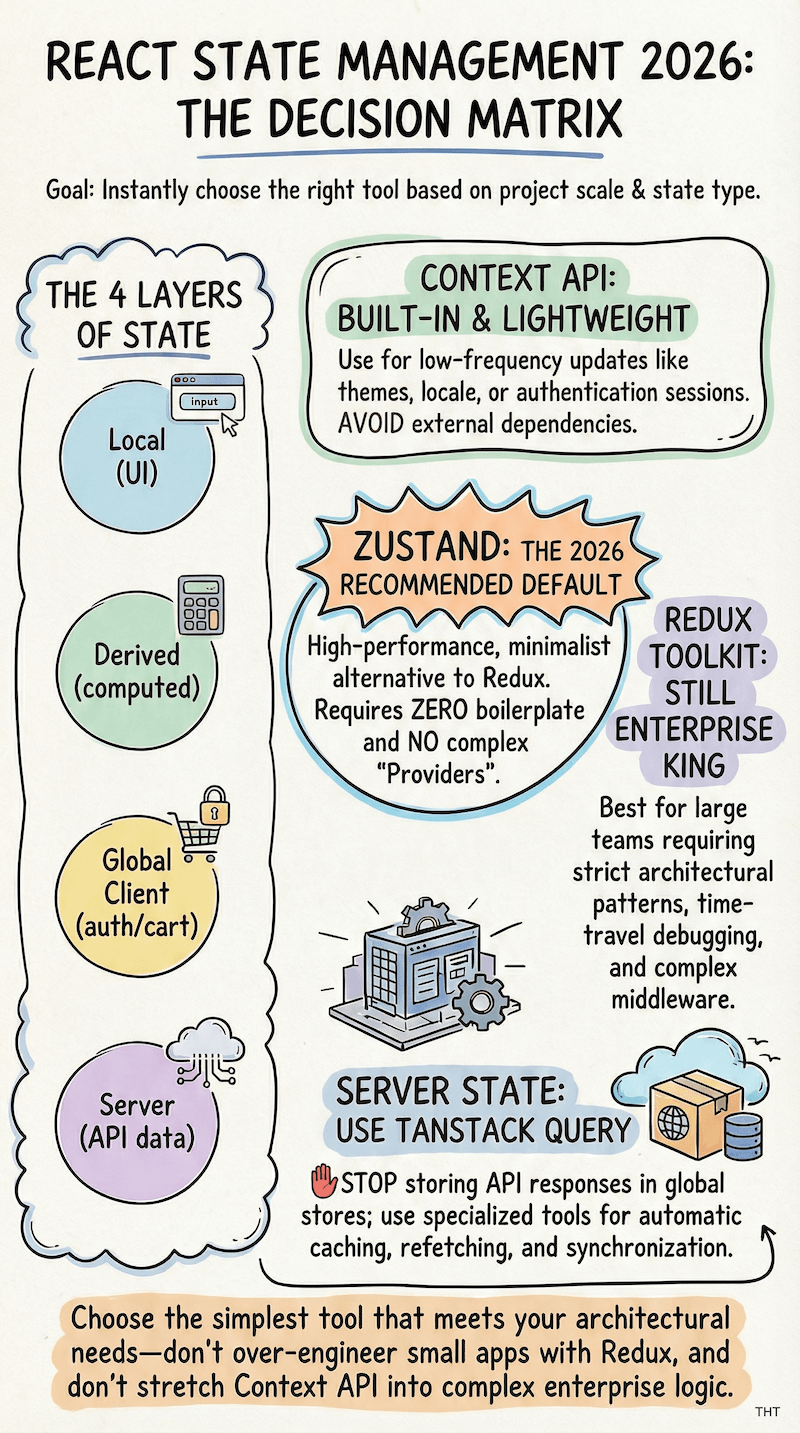
Level 3: Modern Global Client State (The Favorites)
This is where your “I know”s might start crumbling, and confusion arises. For medium-to-large apps, you’ll often want a dedicated state management library.
In 2026, the conversation has largely converged on a few clear favorites.
Zustand — The Modern Default
Complexity: Low | Install:
npm install zustand| Best for: Most apps
Zustand (German for “state”) is lightweight, fast, and remarkably easy to use. It’s built on hooks, requires no providers, and gets out of your way.
Tip: If you’re starting a new project and aren’t sure which global state library to pick, Zustand is the answer for most cases.
Here’s what a Zustand store looks like:
// store/useCartStore.js
import { create } from 'zustand';

const useCartStore = create((set) => ({
  items: [],
  total: 0,

  addItem: (item) =>
    set((state) => ({
      items: [...state.items, item],
      total: state.total + item.price,
    })),

  removeItem: (id) =>
    set((state) => {
      const item = state.items.find((i) => i.id === id);
      return {
        items: state.items.filter((i) => i.id !== id),
        total: state.total - (item?.price ?? 0),
      };
    }),

  clearCart: () => set({ items: [], total: 0 }),
}));
And consuming it in any component without wrapping anything in a Provider:
// CartIcon.jsx
function CartIcon() {
  const items = useCartStore((state) => state.items);
  return <div>🛒 {items.length}</div>;
}

// ProductCard.jsx
function ProductCard({ product }) {
  const addItem = useCartStore((state) => state.addItem);
  return <button onClick={() => addItem(product)}>Add to Cart</button>;
}
These two components don’t need to know about each other. They both talk to the store 🙌
Why people love it: There’s no boilerplate. There are no providers. And it’s a tiny bundle size (~1kB). Need I say more?
This way you subscribe only to the state slice you need (so CartIcon doesn’t re-render when something unrelated in the store changes). It’s the pragmatic choice.
When to use it: Pretty much any time you need global client state that isn’t better handled by TanStack Query (more on that below).
Shopping carts, user preferences, UI state that spans multiple pages, notification queues—Zustand handles all of it cleanly.
Jotai / Recoil — The Atomic Approach
Complexity: Moderate | Install:
npm install jotai| Best for: Fine-grained, interdependent state
Jotai and Recoil take a fundamentally different mental model from Zustand.
Instead of one big store, you break state into tiny, independent units called atoms. Components subscribe only to the atoms they need, which gives you incredibly precise control over re-renders.
// atoms.js
import { atom } from 'jotai';

export const usernameAtom = atom('');
export const emailAtom = atom('');
export const isSubmittingAtom = atom(false);

// A "derived atom" that computes from other atoms
export const isFormValidAtom = atom(
  (get) => get(usernameAtom).length > 0 && get(emailAtom).includes('@')
);
// UsernameInput.jsx — only re-renders when usernameAtom changes
function UsernameInput() {
const [username, setUsername] = useAtom(usernameAtom);
return <input value={username} onChange={(e) => setUsername(e.target.value)} />;
}
// SubmitButton.jsx — only re-renders when isFormValidAtom changes
function SubmitButton() {
const isValid = useAtomValue(isFormValidAtom);
const isSubmitting = useAtomValue(isSubmittingAtom);
return <button disabled={!isValid || isSubmitting}>Submit</button>;
}See the difference here? We broke a store into parts, and only changes to a part (not a store) will affect components.
When to use Jotai’s atomic model: You have…
- Complex forms where many fields have interdependencies
- Highly interactive UIs where specific components need to be very selective about when they re-render
- Apps where the dependency graph between pieces of state is deeply complex
Note 👀
Between Jotai and Recoil, Jotai has become the more actively maintained and recommended choice as of 2026. Recoil was Facebook’s experiment in atomic state, but Jotai learned from it and iterated further.
Zustand vs Jotai: Which One Do You Actually Pick?
After reading both sections, you might be wondering, “Okay, so which should I use?”
They both handle global state, they’re both relatively simple, so what’s actually the deciding factor?
Here’s the clearest way I can frame it: Zustand thinks in stores. Jotai thinks in atoms.
With Zustand: You define a single store object upfront—your app’s cart, your user preferences, your notification queue all live in one place (or a few stores).
Components subscribe to slices of that store. It’s a clear, centralized mental model, so you always know where your state lives.
With Jotai: There’s no store to define. You create individual atoms wherever you need them, and components subscribe to exactly those atoms.
State is distributed across your codebase rather than centralized.
So when does Jotai’s model actually win?
Imagine you’re building a spreadsheet app. Each cell has its own value, and some cells contain formulas that depend on other cells.
You have thousands of cells, and you need re-renders to be surgical—updating cell A1 should never cause cell Z99 to re-render just because they’re in the same store.
Jotai’s derived atoms handle this kind of dependency graph naturally:
// Each cell is its own atom
const cellA1 = atom(10);
const cellA2 = atom(20);

// This atom only re-renders components that read it when A1 or A2 changes
const cellA3 = atom((get) => get(cellA1) + get(cellA2));
With Zustand, you can achieve similar granularity using selectors, but you’re working against the grain of the library’s mental model.
Jotai’s atomic approach makes it natural.
When Zustand is clearly the better fit:
Think of a typical e-commerce app. You have a cart store, a user store, and maybe a UI store for things like active filters and sidebar state.
The data relationships are straightforward; the team can look at the store files and immediately understand what global state exists.
You’re not dealing with thousands of individually reactive pieces of data. Zustand’s centralized approach keeps things simple and predictable.
The short answer: start with Zustand. It’s less opinionated and easier to onboard new developers.
Only reach for Jotai when your state has complex interdependencies, and you’re hitting real re-render performance issues that Zustand selectors aren’t solving cleanly.
Level 4: Enterprise and Logic-Heavy Standards
Redux Toolkit (RTK) — The Enterprise Standard
Complexity: Moderate–High | Install:
npm install @reduxjs/toolkit react-redux| Best for: Large teams, complex async, time-travel debugging
Redux has been around since 2015, and if you’ve been in React circles for any amount of time, you’ve probably heard the reputation, both ways.
There was a stretch where it felt like Redux was everywhere, even in apps that absolutely didn’t need it.
And fair enough, the old Redux API was verbose enough that some developers swore it off entirely.
Then Redux Toolkit came along with less boilerplate, built-in Immer for “mutating” state safely, and a much more approachable developer experience.
But the truth is that Redux, even modernized, is a tool with a specific purpose. It wasn’t designed to be your cart state manager on a three-page side project.
Redux was designed to bring order to large, complex applications where multiple teams are touching shared state every day.
RTK uses slices, which are self-contained units that define a piece of state, its reducers, and its actions together:
// features/cartSlice.js
import { createSlice } from '@reduxjs/toolkit';

const cartSlice = createSlice({
  name: 'cart',
  initialState: { items: [], total: 0 },
  reducers: {
    addItem: (state, action) => {
      state.items.push(action.payload); // Immer lets us "mutate" here safely
      state.total += action.payload.price;
    },
    removeItem: (state, action) => {
      const index = state.items.findIndex((i) => i.id === action.payload.id);
      if (index !== -1) {
        state.total -= state.items[index].price;
        state.items.splice(index, 1);
      }
    },
  },
});

export const { addItem, removeItem } = cartSlice.actions;
export default cartSlice.reducer;
// In a component
import { useSelector, useDispatch } from 'react-redux';
import { addItem } from './features/cartSlice';
function ProductCard({ product }) {
const dispatch = useDispatch();
const cartCount = useSelector((state) => state.cart.items.length);
return (
<button onClick={() => dispatch(addItem(product))}>
Add to Cart ({cartCount} in cart)
</button>
);
}When to use Redux:
- You’re on a large team (15+ developers), and architectural consistency matters
- You need powerful debugging—Redux DevTools’ “time-travel” (step backwards through every state change) is legitimately invaluable for complex bugs
- Your app has heavy async logic that benefits from Redux’s middleware ecosystem
- The team already knows Redux, and switching costs would be high
When Redux Becomes a Burden
Redux’s structure is a feature at scale and a cost at small scale. It’s worth being honest about what that cost looks like, because it’s the main reason so many developers end up resenting it when it’s the wrong fit.
To add a simple new piece of state in Redux, you need to:
- Create or update a slice
- Define a reducer
- Export an action creator
- Configure the store if it’s a new slice
- Connect it via
useSelectoranduseDispatchin your component
That’s five steps for something that takes one line in Zustand.
On a solo project or a small startup team, that overhead adds up fast. It slows down the kind of rapid iteration you need early on.
There’s also an onboarding cost. A junior developer joining a Redux codebase needs to understand the entire pattern—store, slices, reducers, selectors, dispatch—before they can safely make even a small change.
Tip 💡
If you happen to be onboarding in a team that does use Redux, be proactive by leveraging AI in the code editor to help you understand the codebase. Ask your questions and follow along to cut back tremendously on time. Do not skip the exploratory part with expectations to have AI do the work.
That’s a real barrier. On a Zustand codebase, they can often read a store file and start contributing the same day.
Redux makes the most sense when these costs are worth paying. When you have enough developers that “everyone doing their own thing” with state creates real inconsistency, when debugging requires replaying state changes step by step, and when strict conventions are a feature rather than friction.
A team of three building a startup? Zustand.
A team of twenty maintaining a financial platform? Redux might be exactly the right call.
XState — The State Machine Approach
Complexity: High | Install:
npm install xstate @xstate/react| Best for: Complex event-driven flows with finite, known states
XState is in a category of its own. It’s based on finite state machines and statecharts—a formal model from computer science that guarantees an app can only ever be in one defined state at a time, and can only transition between states through explicit, permitted paths.
Let’s unpack that:
“Finite” means the list of possible states is known and complete before you write any code.
“Machine” means the system has rules. You can’t jump from state A to state C without going through state B, unless you explicitly define that as a valid transition.
“Statecharts” extend this to handle parallel states and nested conditions, which is what makes XState powerful for real-world UI.
Think of it like a flowchart that React enforces at runtime. If a transition isn’t defined, it simply can’t happen, so the machine ignores it. That’s the guarantee.
Sounds intense, I know. Here’s when it becomes obviously the right tool:
The Boolean Flag Problem
Imagine you’re building a multi-step form with validation, network requests, and error recovery.
With regular state management, you might have booleans like isLoading, isSubmitted, hasError, isRetrying. The combinations of those flags can create weird, impossible states. (isLoading: true AND isSubmitted: true? What does that even mean?)
The reason you land in this situation is gradual. You start with isLoading. Then you add error handling, so you need hasError. Then the design asks for a retry button, so you add isRetrying.
Each addition feels reasonable on its own. But now you have four booleans that can theoretically be in 16 different combinations, and only 4 or 5 of those combinations actually make sense in your UI.
The rest are bugs waiting to surface. Maybe a race condition sets isLoading back to true after a successful submission. Maybe an error clears, but the isSubmitted flag is still true.
Your component’s if/else logic has to guard against every one of these cases, and it never quite does 🙈
XState prevents that class of bug entirely:
import { createMachine, assign } from 'xstate';

const checkoutMachine = createMachine({
  id: 'checkout',
  initial: 'idle',
  context: { error: null, orderId: null },
  states: {
    idle: {
      on: { SUBMIT: 'submitting' },
    },
    submitting: {
      invoke: {
        src: 'submitOrder',
        onDone: { target: 'success', actions: assign({ orderId: (_, e) => e.data.id }) },
        onError: { target: 'error', actions: assign({ error: (_, e) => e.data.message }) },
      },
    },
    success: { type: 'final' },
    error: {
      on: { RETRY: 'submitting', CANCEL: 'idle' },
    },
  },
});
// In your component
import { useMachine } from '@xstate/react';
function Checkout() {
const [state, send] = useMachine(checkoutMachine);
if (state.matches('submitting')) return <LoadingSpinner />;
if (state.matches('success')) return <SuccessMessage orderId={state.context.orderId} />;
if (state.matches('error')) return <ErrorMessage error={state.context.error} onRetry={() => send('RETRY')} />;
return <button onClick={() => send('SUBMIT')}>Place Order</button>;
}When to use XState:
- Multi-step wizards or flows with complex branching
- Features with many possible states and explicit transitions between them (think: a real-time collaborative editor, a payment flow, a video player)
- Anywhere that impossible UI states are a serious bug risk
Tip ✅
XState has a free visual editor (stately.ai) that lets you draw your state machine as a diagram before writing code. If you’re working through a complex flow with a team, this is a fantastic alignment tool!
Level 5: Server State and The Future of Architecture
Before we go further, a quick note on what “server state” means, since it refers to two different things that are often confused.
- Data synchronization: Keeping your client-side app in sync with data that lives on a server. That covers your list of posts, a user’s profile, or search results. It all existed from the beginning of React and has always been a challenge.
- Server-side rendering: Running your components on the server instead of the browser, so the user receives already-rendered HTML rather than a blank page waiting for JavaScript to load.
React has had partial server-side rendering support for years through frameworks like Next.js and Gatsby. But the approach felt tacked on—components were built for the client, briefly rendered on the server first, then the client immediately took over.
It worked, but it came with complexity and limitations.
React Server Components (RSC) represent a more fundamental shift: components that run exclusively on the server, never shipping their JavaScript to the client at all. This became possible as React’s architecture matured, as edge computing made server-side execution faster and cheaper, and as the ecosystem built tooling (primarily Next.js App Router) to make it practical.
The result is that “server state” in 2026 looks meaningfully different from what it did a few years ago, and affects how you think about all the client-side tools above.
TanStack Query (React Query) — For All Your API Data
Complexity: Moderate | Install:
npm install @tanstack/react-query| Best for: Any data that comes from an API
How Most Developers Fetch Data First (and Why It Gets Messy)
If you learned to fetch data in React before discovering TanStack Query, you probably wrote something like this:
function PostsList() {
  const [posts, setPosts] = useState([]);
  const [isLoading, setIsLoading] = useState(true);
  const [error, setError] = useState(null);

  useEffect(() => {
    setIsLoading(true);
    fetch('/api/posts')
      .then(res => res.json())
      .then(data => {
        setPosts(data);
        setIsLoading(false);
      })
      .catch(err => {
        setError(err);
        setIsLoading(false);
      });
  }, []);

  if (isLoading) return <Skeleton />;
  if (error) return <ErrorMessage />;
  return posts.map(post => <PostCard key={post.id} post={post} />);
}
I certainly did with the Quote App I completed a few years back, where I fetched images and quotes in bulk using the useEffect hook.
This works. But notice what you have to manually manage:
- loading state
- error state
- setting them both correctly in the right order
- clearing them properly
Now imagine what happens if the user navigates away and comes back?
The data is fetched again from scratch, causing a loading flicker even if the data probably hasn’t changed.
What if two components need the same post data? You’d either prop-drill or fetch twice.
What if you want the data to automatically refresh every 30 seconds? Now you’re adding intervals and cleanup logic.
Though we can solve each case on its own, you end up solving them yourself, every time, for every piece of server data in your app. That’s the cost.
Understand and remember that the data from your API is not the same kind of “state” as your UI state. It has different requirements—needs to be cached, it can go stale, might need refetching in the background, and other users might change it on the server simultaneously.
How TanStack Helps Solve Data Fetching in React
Treating server data like local state is what creates all of those manual problems above.
TanStack Query is purpose-built for this problem. It handles fetching, caching, background refetching, and loading/error states automatically.
import { useQuery, useMutation, useQueryClient } from '@tanstack/react-query';

// Fetching posts — loading, error, and caching handled automatically
function PostsList() {
  const { data: posts, isLoading, isError } = useQuery({
    queryKey: ['posts'],
    queryFn: () => fetch('/api/posts').then(res => res.json()),
    staleTime: 5 * 60 * 1000, // Data stays "fresh" for 5 minutes
  });

  if (isLoading) return <Skeleton />;
  if (isError) return <ErrorMessage />;

  return posts.map(post => <PostCard key={post.id} post={post} />);
}

// Creating a post and automatically refreshing the list
function NewPostForm() {
  const queryClient = useQueryClient();

  const mutation = useMutation({
    mutationFn: (newPost) => fetch('/api/posts', { method: 'POST', body: JSON.stringify(newPost) }),
    onSuccess: () => {
      // Tell TanStack Query: the 'posts' cache is now stale, go refetch it
      queryClient.invalidateQueries({ queryKey: ['posts'] });
    },
  });

  return (
    <form onSubmit={(e) => { e.preventDefault(); mutation.mutate({ title: 'New Post' }); }}>
      <button type="submit" disabled={mutation.isPending}>
        {mutation.isPending ? 'Saving...' : 'Create Post'}
      </button>
    </form>
  );
}
This is the stale-while-revalidate pattern: TanStack Query shows you cached data immediately so your users see content the moment a component mounts—there’s no loading flicker. Then quietly refetches in the background to check if anything has changed.
If it has, it updates the UI. If it hasn’t, nothing happens, and no extra work was done.
The practical effect is significant. Components that would have needed a useEffect + three useState calls now need one useQuery.
Multiple components requesting the same data automatically share a single fetch request and a single cache entry. Navigating away and back doesn’t trigger redundant fetches.
And when you create or update data with useMutation, you can invalidate specific cache keys so the UI stays in sync automatically.
One thing to keep in mind: TanStack Query adds a layer of abstraction that’s sweet at first until something isn’t fetching when you expect it to, or is fetching when you don’t expect it to. The culprit is usually your staleTime or gcTime configuration.
Taking an hour to read through the caching docs early on will save you a lot of hair-pulling later.
When to use it: If your app fetches from an API at all, use TanStack Query. It’s become the industry standard for server state, and once you’ve used it, you’ll wonder how you managed without it.
Note 😌
A common mistake when adopting TanStack Query is also storing API responses in Zustand or Redux. Don’t do this. Let TanStack Query own your server data. Let Zustand own your client-only UI state (like “is this sidebar expanded?”). They’re complementary, not competing.
React Server Components (RSC) — The Architectural Shift
Complexity: High (requires framework support) | Framework: Next.js 13+, Remix | Best for: Reducing client-side JavaScript
React Server Components are the biggest architectural change to hit React in years, so here’s a little explanation.
In traditional React, all your components run in the browser. They fetch data, hold state, and render HTML.
RSC flips this for components that don’t need interactivity. Those components run on the server, and React streams the already-rendered HTML to the browser.
Components that don’t need interactivity are more common than you might think. Take a blog post body, for example. Or a product description, a list of items fetched from a database, or a page header with the user’s name. None of these need onClick handlers or useState—they just need data and markup.
In a traditional React app, you’d still ship all the JavaScript for those components to the browser, even though it’s never used for anything interactive. RSC simply doesn’t do that.
This has a meaningful implication for state: if a component doesn’t need to be interactive, it doesn’t need any client-side state at all. You can just fetch data directly in the component, like you used to do in server-rendered frameworks, and ship rendered HTML instead of JavaScript.
// app/posts/page.jsx (Next.js App Router)
// This runs on the SERVER. No useState. No useEffect. No loading spinner.
// The data is fetched and rendered before the user ever gets the HTML.
async function PostsPage() {
  const posts = await fetch('<https://api.example.com/posts>').then(res => res.json());

  return (
    <div>
      {posts.map(post => (
        <article key={post.id}>
          <h2>{post.title}</h2>
          <p>{post.excerpt}</p>
        </article>
      ))}
    </div>
  );
}
To see why this matters, here’s what the same page would look like in a traditional client-side React app that you’d build without a framework or with an older Next.js setup:
// Traditional React — everything runs in the browser
function PostsPage() {
  const [posts, setPosts] = useState([]);
  const [isLoading, setIsLoading] = useState(true);

  useEffect(() => {
    fetch('<https://api.example.com/posts>')
      .then(res => res.json())
      .then(data => {
        setPosts(data);
        setIsLoading(false);
      });
  }, []);

  if (isLoading) return <Skeleton />;

  return (
    <div>
      {posts.map(post => (
        <article key={post.id}>
          <h2>{post.title}</h2>
          <p>{post.excerpt}</p>
        </article>
      ))}
    </div>
  );
}
Both render a list of posts. However, the traditional version ships JavaScript to the browser, runs it, makes a network request from the client, waits for the response, manages loading state, and then renders.
The RSC version does all of that on the server before the user even receives the page and ships zero JavaScript for this component.
What this means for state management: In RSC architecture, your client state becomes smaller and simpler. You’re using Zustand or useState for UI interactions and optimistic updates, not to store API responses that the server already manages.
This is still an evolving area, and full adoption requires a framework. Next.js App Router is the most mature option as of 2026 since it’s production-ready, and the RSC mental model was largely designed around it.
Remix has its own data-loading conventions that achieve similar goals through a different approach.
What About Gatsby?
Gatsby is a different case. It’s primarily a static site generator, which means it renders your pages at build time, not at request time. That’s great for content that rarely changes (marketing pages, docs, blogs), but it doesn’t support the dynamic, per-request server rendering that RSC provides.
I used Gatsby to build recent versions of my portfolio and have even used it in enterprise settings with a headless CMS setup.
If you’re deciding between Next.js and Gatsby, the question is: does your content need to be up-to-date with every request, or can it be pre-built and deployed as static files?
For anything dynamic—user-specific data, real-time content—Next.js and RSC are the right direction.
For purely static content where maximum performance and simplicity are the priority, Gatsby still earns its place.
Tip 👇
If you’re building something new with Next.js, it’s worth reading through the App Router docs even if you don’t fully adopt RSC patterns immediately. Understanding the model early will help you make better architectural decisions.
Which React State Management Tool Should You Use?
Alright, here’s the actual decision framework. When you’re starting a feature or a new project, ask these questions in order:
Is this state only needed in one component?
→ Yes: useState or useReducer
Is the update logic complex, or are multiple values changing together?
→ Yes: useReducer. No: useState
Does this state need to be shared across distant components?
→ Infrequent changes (theme, auth, locale): Context API
→ Frequent changes or performance matters: Zustand
Does this data come from an API?
→ Almost always: TanStack Query. Don’t put API responses in Zustand/Redux.
Do you need time-travel debugging, strict architectural conventions, or are you on a large enterprise team?
→ Redux Toolkit
Does your feature have complex event-driven logic where impossible states are a real risk?
→ XState
Are you on Next.js and building data-heavy pages that don’t need interactivity?
→ Explore React Server Components to skip client state entirely
So, What’s Your Preferred State Management Approach?
When someone asks this in an interview or a code review, here’s a confident, well-reasoned answer that shows you understand the landscape.
It’s also my response, so feel free to use it as a base and make it yours:
“It depends on the layer. For local component logic, I use useState or useReducer. For most global client states, I reach for Zustand—it’s simple, fast, and doesn’t need providers. For server data, TanStack Query is the standard; I don’t put API responses in client state stores. If I’m on a large team or working on something complex, Redux Toolkit has the structure that scales. And for complex event-driven flows, XState is the right tool.”
That answer says: I know the landscape, I have opinions, and I’ve thought about the tradeoffs. That’s exactly what the question is looking for. It’s not a matter of a single source of truth because, in all honesty, none exists.
It’s a Wrap
State management in React isn’t about finding the one true solution. It’s about understanding the right tool for the right layer of your app.
Local, global, server—each has its own needs and its own best-in-class options.
Here’s the cheat sheet version:
| Use Case | Tool |
|---|---|
| Simple local value | useState |
| Complex / interrelated local state | useReducer |
| Infrequent global data (theme, auth) | Context API |
| Most global client state | Zustand ← your new default |
| Fine-grained atomic updates | Jotai |
| All API / server data | TanStack Query ← also your new default |
| Enterprise scale / debugging power | Redux Toolkit |
| Complex event-driven state machines | XState |
| Server-rendered non-interactive components | React Server Components |
The good news? You don’t need to master all of these at once.
Start with useState and useReducer until they feel natural. Layer in TanStack Query the moment you’re fetching data from an API. Add Zustand when prop drilling starts to hurt or, even, start with Context as I did.
The others are there when you actually need them.
That’s a healthier progression than jumping to Redux on day one because “that’s what React apps use”, a mistake a lot of us made early on.
If you want to go deeper on any of these, the official documentation for each is an excellent starting point. And if you’re just getting started with React state management in general, bookmark this post!
The landscape will keep evolving, but these mental models will carry you a long way.
Thanks for sticking with me through this one—it’s a ton of info, and you made it to the end 👊
‘Till next time.


