
Here is the sequel to CSS visual formatting part one, covering margins, paddings, borders, and a few other stylistic components like fonts and alignment.
Learn the essential CSS visual formatting properties you need to start styling web pages and grow your web development skills.
CSS Margins
The CSS margin property creates space around an element. Assigned values for margin are applied clock-wise starting from the top.
| Setting margin as | Does what? |
|---|---|
| one value (ex. margin: 50px) | Applies the value all around an element. |
| two values (ex. margin: 50px 100px) | Applies the first value to the top, second to the right, first to the bottom, second to the left. |
| four values (ex. margin: 50px 100px 20px 10px) | Applies the first value to the top, second to the right, third to the bottom, fourth to the left. |
For example, margin: 100px 150px 20px 210px; applies margins clock-wise starting from the top (100px) to the right (150px), bottom (20px), and left (210px).
<div id="no-margin">
    <p>NO MARGINS</p>
</div>

<div id="margin">
    <p>MARGINS</p>
</div>
#no-margin {
width: 200px;
height: 200px;
background-color:red;
}
#margin {
width: 200px;
height: 200px;
background-color: yellow;
margin: 100px 150px 20px 210px;
}
p {
text-align: center;
padding-top: 50%;
}


You can likewise specify which margin you want to change by targeting the margin using margin-[side] with [side] being top, bottom, left, or right.
HINT
Margin is different from relative position because it affects the size of the element.
Adding left and right margins to an element with a width of 100px changes the overall width of the element by 100px + left-margin + right-margin. Similarly, adding top and bottom margins affects the height of the element.

CSS Padding
Margins and padding are two CSS properties that tend to get mixed up. Though similar, they are distinct so let’s demystify them for good to avoid confusion.
Padding is like margin but inside an element. Whereas margin adds space around an element, padding creates space inside an element’s borders.
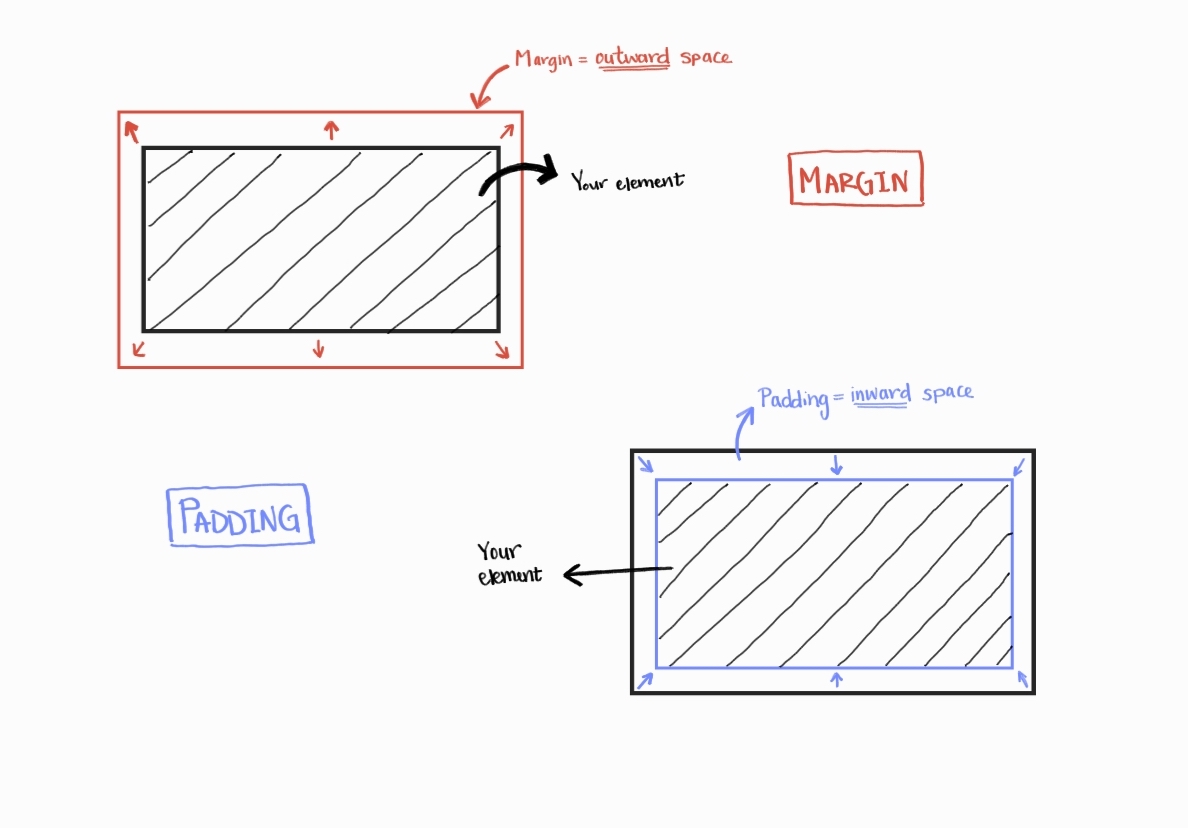
Apply padding values clock-wise like margins. So if you have an element with padding: 50px 20px, the top and bottom will have a padding of 50px with left and right that of 20px.
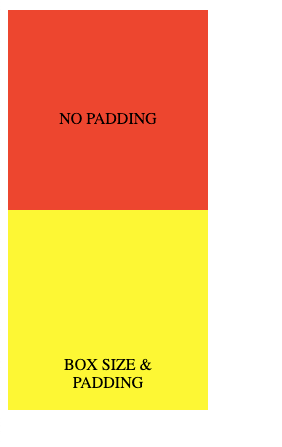
<div id="no-padding">
    <p>NO PADDING</p>
</div>

<div id="padding">
    <p>PADDING</p>
</div>
#no-padding {
width: 200px;
height: 200px;
background-color:red;
}
#padding {
width: 200px;
height: 200px;
background-color: yellow;
padding: 50px 20px;
}
p {
text-align: center;
padding-top: 50%;
}


Both margin and padding:
- Apply values clock-wise unless setting specific sides
- Add on top of the width/height of the element
Tip: Use the CSS box-sizing property set to border-box to keep width untouched when adding a border or padding.
Add box-sizing: border-box; to #padding in the example above.

Tip
To get rid of default margins and/or padding, set margin and padding to zero (as we did for the cover overlay project).
CSS Specificity
You can assign both a class and id to an HTML element to make recurring and unique style changes.
IDs are unique and let you refer to different styles among elements whereas classes let you refer to the same styles among elements.
Specificity is the order the browser decides to apply CSS properties based on relevancy. The order of selectors from most specific to least specific is inline styles, ids, classes, attributes, pseudo-classes, elements, and pseudo elements.
In the case of conflicting styles, improve your selector or use !important to override any parent styles.
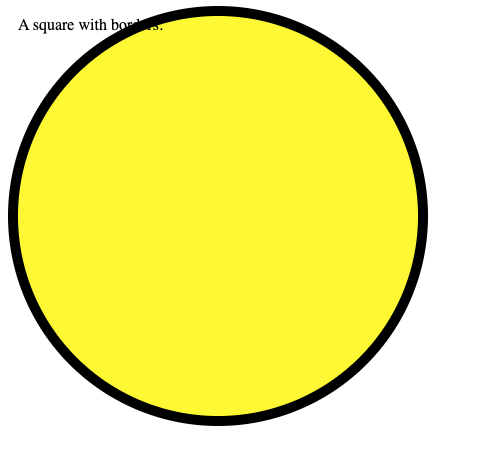
CSS Borders
For borders, you need to specify three things: width(px), color, and style.
<div>A square with borders.</div>div {
width: 400px;
height: 400px;
background-color: yellow;
border: 10px black solid;
}
You could, also, set each one individually using the properties border-width, border-color, border-type.
Note: Border-radius adds curved edges and, unlike its name suggests, does not add a border. Setting it to 50% or 100% will transform a square element into a circle.
Add border-radius: 100%; to the div above.
CSS Fonts
You can change the font by setting the CSS font-family property.
<p>This paragraph has the font applied to the body of the document.</p>
<h2>THIS HEADING NEEDS TO BE ANOTHER FONT</h2>
<p>Do you see the difference?</p>
body {
        font-family: 'Courier New', Courier, monospace;
    }


h2 {
        font-family: Arial, Helvetica, sans-serif;
    }
Tip: It’s good practice to expand by commas to at least 3 back-up fonts in case a browser doesn’t support the main font. If none are provided, the browser will render its default.
Tip
For a font family that is more than one word, put it in quotations.
Example: “Times New Roman”.
How to Use Google Fonts
Google fonts provide more font variety. To use google fonts, you will first need to import the google fonts stylesheet in the HTML page and then reference the font in your CSS stylesheet.
Read: 3 Ways You Can Add CSS To HTML
- Go to https://fonts.google.com/
- Select a style — ex. Roboto mono

- Copy the embed code
- Paste it anywhere in the <head> section like you would any external stylesheet
- Copy the CSS property and paste in your stylesheet


CSS Styling
To keep styles separate from content, avoid using HTML built-in style properties like bold and italic. You can easily do the same thing with CSS.
font-weight-> boldfont-style-> italictext-decoration-> underline
Intro to pseudo-classes
Pseudo-classes allow you to style particular elements under certain conditions.
Take for instance a link. By default, it’s underlined and has a distinct font color – usually blue – indicating it is a link.
<a href="">This is a link with default styles.</a>
Let’s say we want the link to be underlined only when you hover your mouse pointer over it, otherwise, it will not be underlined.
To achieve this, we first need to remove the underline from our link.
a {
    text-decoration: none;
}
Then we can specify we want the link underlined under the condition that we hover over it. To do this, reference the element (a) followed by a colon ( : ) and the condition (hover).
a:hover {
    text-decoration: underlined;
}
Aligning Text
Use text-align to align text left, right, or center relative to the container of its parent element.
<div>
    <p>LEFT ALIGNED (default) paragraph.</p>
    <p id="center">CENTER ALIGNED (default) paragraph.</p>
    <p id="right">RIGHT ALIGNED (default) paragraph.</p>
</div>
div {
width: 400px;
height: 400px;
border: 5px black dashed;
}
#center {
text-align: center;
}
#right {
text-align: right;
}
Tip: To center an image, set its display as block and its left and right margins to auto.
img {
    display: block;
    margin: 0 auto;
}
Since the text-align CSS property only applies to block elements, it won’t affect the image by itself as <img> is an inline element.
Setting the display to block changes <img> to a block element to which we can assign equal width margins based on browser size by using auto.
Discover more visual CSS properties in action right here.


