HTML forms are great for collecting user information to send to a web server for storage. That way web applications will know it’s you logging into, say your email account, instead of DM or kB.
But HTML forms aren’t used only to create accounts – they are great for collecting all sorts of user-generated data.
If the Earth is the web page on your browser and the server that stores information is the Moon, then HTML forms serve as the spaceships getting your requests from planet Earth to the Moon.
Every time you click submit or save or update or delete your request hops onto this spaceship -which, believe it or not, can be invisible – and is transported accordingly to a precise location on the moon.
Awesome, right?
So on a count of 3-2-1 let’s get you started with HTML forms so you can soar the skies!
P.S. DM says I need to chill – sorry not sorry.
You create an HTML web form by using the <form></form> tags.
Similar to what we saw with HTML lists and <div>s, the HTML form tags start out as empty containers consisting of different child elements that make a form look like a form.
But before we dive into <form> child elements, let’s take a look at two important form attributes.
<form ="send me here" ="GET">FORM BODY</form>- action: where to send data once the form is submitted
- method: which HTTP method to use for data delivery. The two most common are:
- GET: can see submission data in URL added after a
?separator (https://www.thehelpfultipper.com/blog?name=some_value) - POST: cannot see submitted data in URL; best for sensitive information (aka the “invisible spaceship” from the intro – in case you were wondering)
- GET: can see submission data in URL added after a
These are not all the form attributes in existence, but just enough to get started. For form attributes in greater detail check out this link.
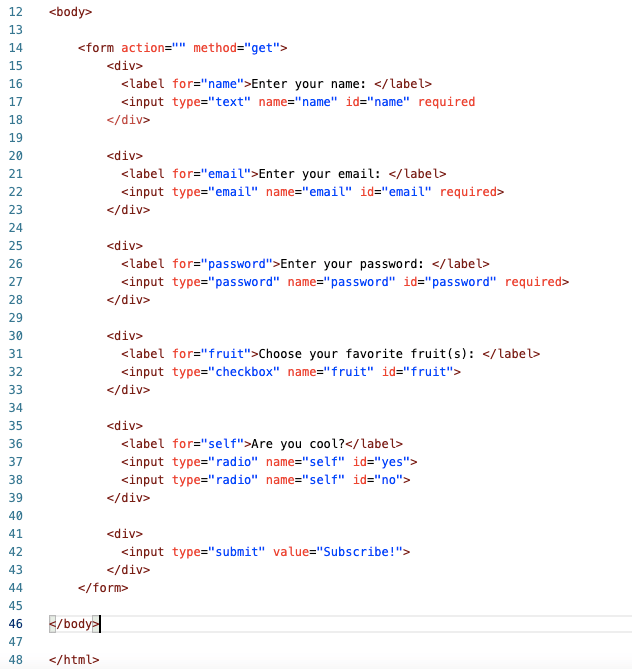
<form action="" method="get">
  <label for="name">Enter your name: </label>
  <input type="text" name="name" id="name" required>
  <label for="email">Enter your email: </label>
  <input type="email" name="email" id="email" required>
  <input type="submit" value="Subscribe!">
</form>
Let’s break things down:
<label ="name">Enter your name: </label>The for attribute points to an <input> by using the input’s id. In the example, the input with the id of “name” is associated with the label for “name”.
A label is not just to organize form material, but you can actually click on the label to select the corresponding input.
Labels are not required – the form will work just fine without them – though some other indicator for the input fields would be necessary to let users know what they are inputting.
<input ="text" ="name" ="name" ="">The <input> tag is a self-closing tag that allows you to insert form data in various different ways. It takes on quite a few attributes so let’s understand them.
1. Type
The type attribute defaults to “text” unless otherwise specified.
| Type | Purpose |
|---|---|
| text | Allows users to insert text in the input box |
| checkbox | Provides simple tickbox |
| radio | Like a checkbox, but a circle with special behaviors (explained further along) |
| submit | Input acts like a button |
You probably noticed in the example provided above that we have an input with a type of email. There are more types than the ones on the table shown here each useful for different built-in validations and behaviors.
For instance, an input with a type of email expects something with the structure of your typical email (tht@iscool.eu) while an input with a type of password hides what is entered by using those cryptic black bullet-like dots.
Now you can tell our web page is getting somewhat crowded. We added the password type input and it went next to our email which is itself next to our name. This is the behavior of inline elements.
But we want to have our fields stacked as we check out the rest of the types. How to do this? Simply add your <input> tags and their corresponding <label> tags (if any) in <div>s.
Remember that a <div> is a block element that takes up the entire line? If you have no idea what the heck we’re talking about, check out this post where we explore the difference between inline and block elements.
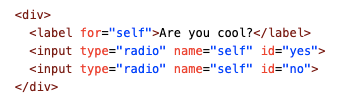
Link radio buttons together by giving them the same name attribute so you can select either one but not all.
To select multiple radio buttons, give them different names.
2. Id
The id acts as a reference to that specific element and an anchor linking the <input> and the <label>.
3. Name
The name attribute is literally the name the value entered will be stored under when the form is submitted.
So, later on, when you are storing input values in databases, you can access the value by its name.
If you submit a form without a name, no user inputs will be stored.
4. Value
Value gives the value of the data that’s displayed.
<input type="submit" ="Subscribe!">
Gives a button that says "Subscribe!"
Let’s change the button from “Subscribe!” to “SUBMIT” in our form.
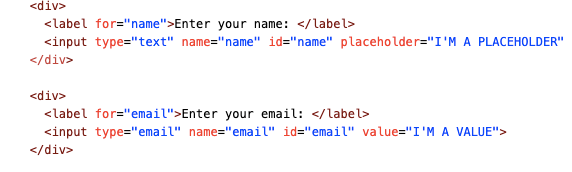
Value vs Placeholder
- Placeholder: shows temporary value in the text box that disappears once a user clicks in it.
: a value isn’t the same as a placeholder. The user needs to delete the value to enter something else whereas the placeholder disappears once the user clicks in the input field.
In the image below, the placeholder appears faded whereas the value is solid.
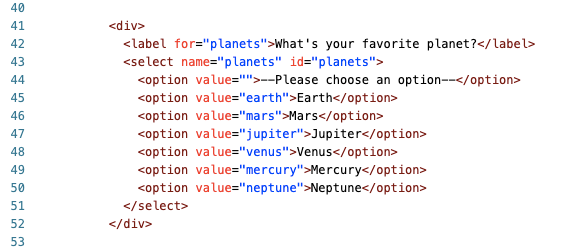
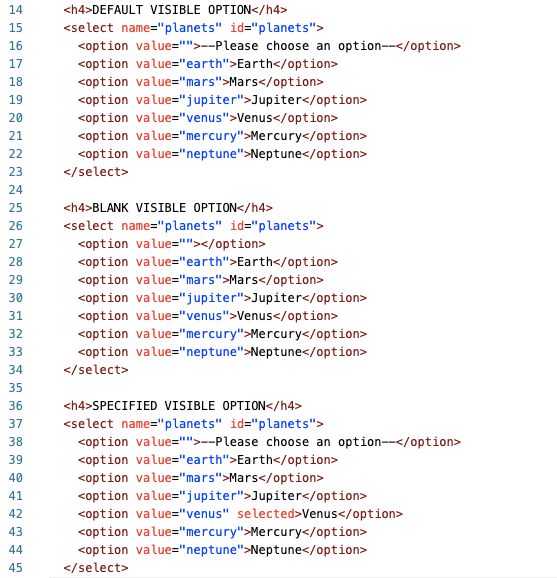
The <select></select> element will give you a drop-down list.
Here the id is used to create the association with the <label> while the name is necessary to identify the data when sent to the server. Under the name of planets, there is going to be a list of the individual items.
Items are defined in <option></option> tags with each item encased in its own tag.
The order of the <option> list will be the order the items will appear in the drop-down menu.
Assign a value to each option to specify the data value you want to store in the list under the name of this dropdown on the server. Otherwise, the data value of the option will default to that of the text contained.
Use the selected attribute to choose which option is to be first and visible without changing the order the <option> tags are listed in your code – else the first <option> will be visible. If you want to leave it blank then don’t provide any text.
** Note **
You can assign values that are completely unrelated to the text contained in the <option> tag, but this will make it harder for you to identify what the data is pointing at.
For example, if we assigned numeric values like 1, 2, 3, and so on, then under “planets” the data stored will be a list of numbers. You will need to somehow know to which planet the values refer otherwise you will have a meaningless list on your hands.
Although it’s too early to work with servers, think of them as massive libraries. The name attribute of elements submitted in the form becomes the title by which you search for your data. So names and values are invaluable (no pun intended) to store and work with information.
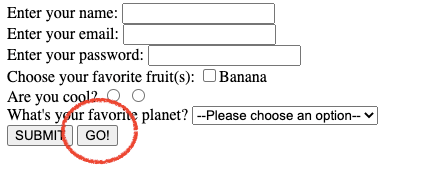
Add your drop-down menu to our form to get the finished product:
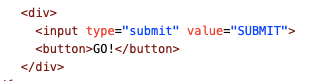
- Buttons
<button></button>inside forms submit by default. You can use a<button>tag instead of an input field that is turned into a button as we have done so far.
Removing the type="submit" of an input field will transform your input button back into its default text field.
Be aware that specifying a
type="button"for an input field, will not submit the form unless specified to atype="submit". That’s because an<input type="button">has no default behavior.
- Use
<textarea></textarea>for longer text inputs.
You can change the size by changing the dimensions of the rows & cols attributes respectively.
Remember to add a name attribute to your textarea as well because you want to store a user’s input!
- Hitting enter, even without a button, will submit the form.
- The required attribute is a nice and quick built-in browser validation that prevents form submission if the user did not fill-in the required field (ex: username, password, email).
<input type="text" name="name" id="name" >Congrats, you can now create an HTML web form that is semi-functional (only because it doesn’t actually submit anything . . . yet). It wasn’t too hard now was it?