
Are you new to coding and don’t know where to begin? This post will show you in 4 easy steps how to set up your coding environment.
You really only need one thing to start coding – a code editor. Let’s get yours up and running then proceed to code your first HTML page.
What is a code editor?
A code editor is a text editor designed for programmers to work with source code. It is not the only way to work with code, but a perfect starting software because it’s free, accessible, and easy to set up.
Check out this article for a detailed description and comparison list of different code editors.
What code editor should you use?
There are many options to choose from, but we’ll be using Visual Studio Code.
If you have used a code editor before that you prefer, stick with it. Though keep in mind some functionalities that are particular to VS Code might not be available.
Why we chose VS Code
VS Code has helpful shortcuts and plugins that make writing code easier. Features like autocomplete allow you to code faster.
Though you might not fully understand the benefits of such tools at this time, trust us when we say you’ll quickly come to appreciate anything that expedites typing out lines of code!
VS Code is also customizable in appearance. There are various themes you can choose from for anyone who is into personalizing their browsers and applications.
Web Browser
There are many different web browsers (Internet Explorer, Safari, Google Chrome, Firefox) – you are free to use whichever you prefer. If you have a favorite browser you feel comfortable using, then go with it.
Otherwise, we’ll be mainly using Google Chrome to take advantage of its awesome developer tools that anyone has access to for free. We will use these tools often to inspect, debug (resolve issues), and understand our code.
Downloading VS Code Editor

- Click download on the upper right-hand corner.

- Choose the system you are using (Mac, Windows, Linux) & install as usual.
- Open when ready – you should see the welcome page. Check the “Show welcome page on startup” button if you want to see the welcome page every time you load VS Code Editor (see bottom of pic below).

And that’s it. You have now installed your code editor. That wasn’t so bad, was it?
We strongly recommend you spent some time customizing or familiarizing yourself to feel more comfortable with it.
Otherwise, let’s write our first piece of code to make sure we’re connected and ready to go.
Let’s now make our first HTML document and render it on the browser.
- Open VS Code Editor and on the welcome page select
"New File"or use command + N on a mac as a shortcut.

- An empty page comes up. Before we type anything, we will save the file as an HTML file to let the code editor and the browser know what language they’ll be parsing.
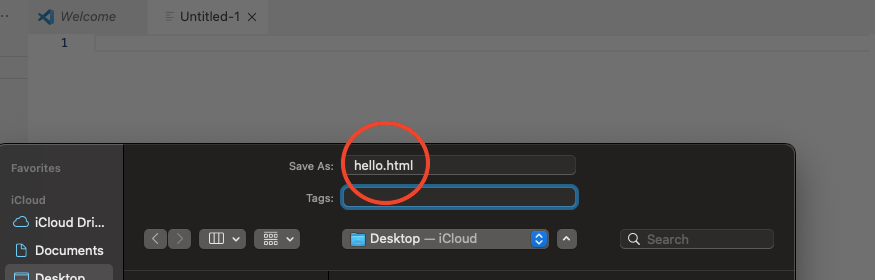
- Do
File–>Save as(command + S on a mac) and name the file whatever you want as long as you add the extension “.html” ~ read as dot html. You’ll always be saving HTML files like this: FileName.html.

- Begin typing
!(exclamation mark) ordocand hit enter.

The typical HTML document structure should auto-populate (if not, you might want to check your code editor’s settings).
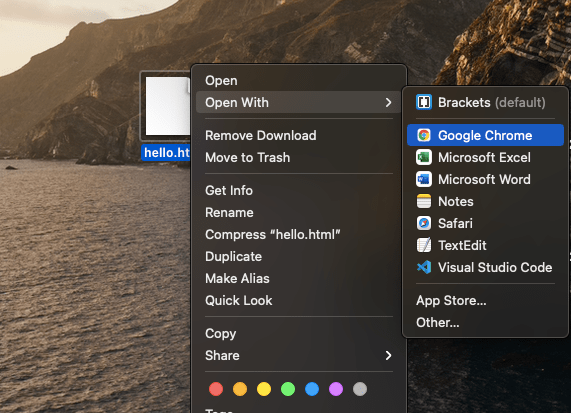
- Now go to where you saved your “.html” file (in our case, the desktop), right-click, select
"open with", and choose Google Chrome (or whichever browser you’re using).

Or on your VS Code HTML file, right-click on the tab, select "copy path", open chrome, and paste the path you just copied.

Hit enter and your document will render – it should be an empty page.
Structure of an HTML document

Think of HTML as the language that adds content to a webpage. If you were to strip away all the styles and colors and boxes and other visual elements that give a webpage shape and structure, what remains is the actual things we read and see (aka all the images and text).
Remember school when you were repeatedly made to practice the outline of an essay? There was an intro paragraph, a body, and then a conclusion. An HML document maintains a very similar outline.
Everything goes into different <tag>s that tell the browser what the content is to be (ex: paragraph, image, list).
Some <tag>s are self-closing while others, like the example below, you need to manually close.
<tag>I am NOT self-closing</tag>.The nice thing about VS Code is it can identify which tags are self-closing from those that aren’t and will automatically auto-complete the closing tag for those that need it.
Try it out!
Type img and hit enter. This is the image tag that allows you to insert images. You’ll see the tag autocompletes and waits to be filled out but there’s no ending, secondary tag.

Then type p and hit enter. Opening and secondary closing tags appear. Your paragraph material goes between these tags!
Understand HTML tags a little better right here. We’ve broken down what you need to know to get started right away.
Let’s briefly understand what we’re looking at:
<!DOCTYPE html>and<html lang="en"></html>formally declare the type of document this will be (HTML) and some other conventional formalities. You don’t need them to run the code you’ll type as long as the file is saved with the “.html” extension. But these tags definitely help the browser, and anyone else, reading your code.
- Then we have the head or the intro of our outline.
<head>

<meta charset="UTF-8">
<meta name="viewport" content="width=device-width, initial-scale=1.0">

<title>Document</title>

</head>
The <meta> tags provide the back-end details your browser needs to show a webpage across different screen sizes and in different languages.
There are many <meta> tags and each serves a different purpose. We will not go into detail here, only know that the first <meta> tag above specifies data storage and the second adjusts the content based on screen size.
Next comes the <title> tag. This sets the title of your browser’s tab NOT the title of the webpage itself.

Remember every time you make a change in your “.html” document, you need to (1) save the file and (2) refresh your browser. Otherwise, you won’t see any changes but that doesn’t mean something is wrong with your code.
Ok, now the last section is the <body></body> which is where nearly all our content goes into. This means images and paragraphs and lists, they’re all INSIDE the <body> tags. Including the title of your webpage!

So far our body is just an empty canvas. Add a title to finish set-up by doing h1 + enter to autocomplete or manually typing out <h1></h1>. Then print something of your choosing.
Remember to save the file and refresh the browser!

And voilà! You’ve just written your first HTML code. Your browser & code editor are linked.
Quick note on spacing
As you probably noticed, there is some indenting that goes on in our HTML document.
Indentation isn’t necessary for the browser to render the file, however, it makes for good practice to write clean, readable code that can be shared and understood by others.
Plus, when you are writing more complex files with lots of content, you’ll thank your lucky stars to have some order and spacing to understand your own code!
Make indentation a habit to distinguish different tags and nest them appropriately. This means keeping in mind parent-child relationships.
For example, the <body> tag is a parent tag. Why? Because all other tags (like <p> or <img> or <h1>) will go inside it. So to designate this relationship we indent the tags that go inside the body.
The same applies to the <head> tag and the tags located inside it.
A good rule of thumb is to always indent a tag that goes inside another tag.
Did you run into any issues? Let us know in the comments.


