

I have a weekly habit of reading through new tech and AI news, mostly to keep up with whatever’s shifted since the last time I looked. A couple of weeks ago, “WebMCP” showed up in one of those reads, and I basically skimmed right past it.
Model Context Protocol (MCP) is everywhere right now. I’ve built a few custom ones myself for different projects, so my brain filed it under “another MCP thing” and moved on.
Then it showed up a second time. And that’s when I actually stopped and asked myself: wait, which MCP is this? Is this a new one?
That question is the entire reason this post exists 💁♀️
I already use Chrome DevTools MCP regularly, so I know what “MCP in my browser tooling” looks like. But WebMCP turns out to be its own thing entirely, which thoroughly intrigued me.
Then I opened DevTools‘ Application tab while working on my HOA Connect app (you can follow updates on LinkedIn; blog post coming soon) and found a WebMCP pane already sitting there.
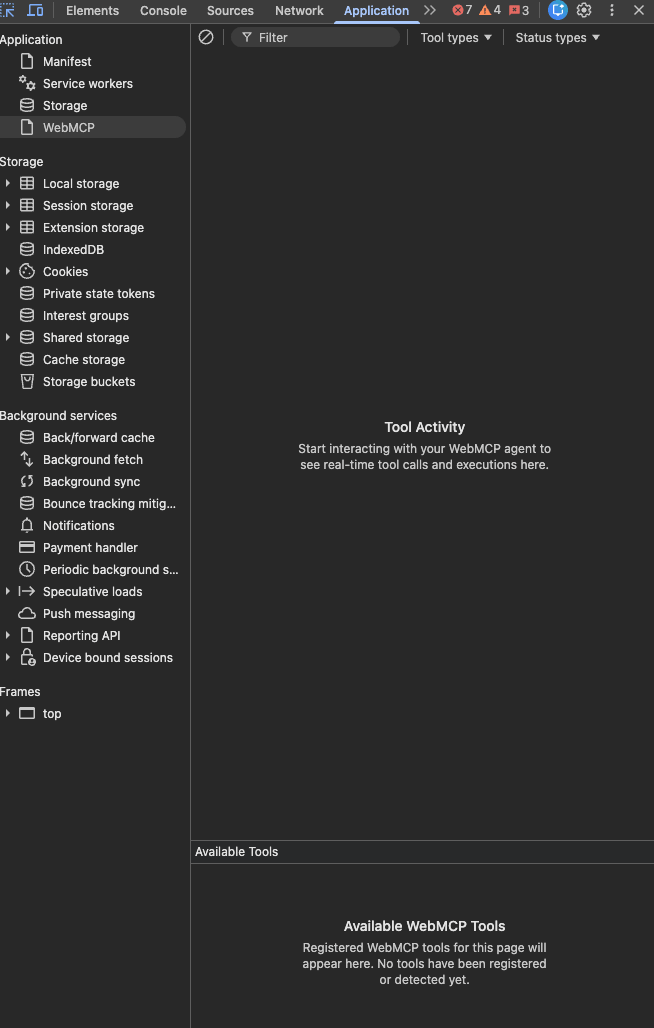
Now, this is when intrigue turns into action. A real, documented browser standard that most people still haven’t touched? Yeah, I’m in.
So that’s what I’m doing today, and I’m learning this alongside you since I don’t have WebMCP production experience going in. My goal is that by the end, we’ll have built a small working demo together where an actual AI agent calls a real JavaScript function I wrote, instead of clicking a button like a human would.
What Is WebMCP? The Browser Standard That Lets AI Agents Skip the Guesswork
WebMCP is a proposed browser standard (created by Google and Microsoft through the W3C’s Web Machine Learning Community Group) that lets a website declare its capabilities directly to an AI agent.
Instead of the agent guessing what a button does, the site tells it.
To understand why that matters, let’s look at what browser agents have been doing up until now.
Most AI agents that “browse” a website today are working off something close to screen-scraping.
- They read the raw HTML or take a screenshot
- Guess what a given button or field is for
- Plan out a sequence of clicks
- Hope none of it breaks halfway through (I’d like to think)
If a designer renames a CSS class or reshuffles the layout, that guesswork can fall apart (a cycle of re-learning and visual scraping needs to occur each time).
WebMCP replaces the guessing with something closer to a contract. A site registers a “tool” (a specific action, like search_flights or, in our case later, buy_snack) along with a plain-language description and a JSON Schema describing exactly what inputs it needs.
The agent no longer needs to interpret the page. It just calls the function. There’s no guesswork, no screenshot squinting.
Note 🤓
The “JSON Schema” is a structured way of describing what shape of data something expects. Instead of hoping an agent sends the right kind of value, you spell it out: this field is a string, it has to be one of these three options, this other field is required. The schema does the explaining so the agent doesn’t have to guess.
WebMCP vs. MCP: What’s Actually Different
Regular MCP, the kind I’ve built before, is typically a backend thing. It connects an AI agent to external systems: databases, APIs, internal tools, whatever. It’s usually implemented with JSON-RPC, has SDKs in languages like Python and TypeScript, and it doesn’t care what browser tab (if any) is open.
It’s available anywhere, anytime, as long as the server’s running.
WebMCP only exists inside your browser tab, and only while that tab is open. Close it, and the tool is gone.
It’s not trying to replace MCP. Chrome’s own documentation describes it almost like the difference between a company’s call center (MCP: available any time, handles the backend logic) and an in-store expert (WebMCP: only available if you’re actually standing in that store, but they know exactly how that specific store works).
Note: Chrome’s docs are careful to call WebMCP “MCP-inspired” rather than an actual JavaScript implementation of MCP. It deliberately leaves out server-side MCP concepts, like “resources,” because those don’t make sense in a browser tab context.
WebMCP vs. Playwright vs. Chrome DevTools MCP: Three Ways an Agent Can Touch a Page
What actually makes WebMCP different, besides the name?
That’s what I really wanted to know, because “AI controls a browser” already describes a few tools I use, not just WebMCP.
It comes down to how much interpreting the agent has to do before it can act.
Playwright drives a browser like a very fast, very literal intern. It clicks, scrolls, and types into fields, the same as you would with a mouse and keyboard, just automated by a script you write yourself. It has no idea what a button means, only where it is on the page.
Chrome DevTools MCP sits one level up. It gives an agent access to the actual browser instrumentation (the console, network requests, DOM snapshots) so the agent can inspect a page and decide what to click based on what it finds. It’s smarter than blind Playwright automation, but it’s still reading the page and inferring intent from markup that was never written with an agent in mind.
WebMCP skips both of those steps. Instead of an agent reading DOM structure or taking a screenshot and guessing, the page hands it a direct, named function with a schema attached. There’s no reading involved.
The agent isn’t inferring that a <button> probably means “buy this” from its label and position. Instead, it’s calling a function that’s explicitly named buy_snack and explicitly documented to need a snack value from a fixed list.
That’s the real difference.
Playwright and DevTools MCP are both still forms of observation since they watch a page and cleverly react to what’s there.
WebMCP is direct access. The agent isn’t pretending to be a mouse anymore. It’s calling a real function I wrote, the same way any other part of my own JavaScript might call it.
Note 👇
None of this makes Playwright or DevTools MCP obsolete. If a site hasn’t implemented WebMCP (most haven’t, yet), observation-based tools are still the only way in. WebMCP is additive, providing a faster, more reliable path when a site chooses to expose it, not a replacement for browser automation everywhere else.
The Two WebMCP APIs: Declarative Forms vs. Imperative JavaScript
WebMCP gives you two ways to expose tools, and they’re aimed at pretty different situations.
The Declarative API is the low-lift option. You add toolname and tooldescription attributes directly onto an existing <form>, and the browser reads your existing labels and inputs to build the JSON Schema automatically for you. If you’ve already got a form on your site, this is mostly just annotation.
The Imperative API is the one I’m using for the demo, because I want to write the function the agent calls. It looks like this:
// My tool >> document.modelContext.registerTool({
  name: 'buy_snack',
  description: 'Purchase a snack from the vending machine by name.',
  inputSchema: {
    type: 'object',
    properties: {
      snack: { type: 'string', enum: ['chips', 'candy', 'soda'] }
    },
    required: ['snack']
  },
  execute: async ({ snack }) => {
// your logic goes here
    return `Dispensed:${snack}`;
  }
});
You give it a name, a description, an inputSchema (that’s the JSON Schema I mentioned earlier), and an execute() function that runs when the agent actually calls the tool.
Tip: Some older examples I came across looked like this:
navigator.modelContext.registerTool(...). That’s already deprecated as of Chrome 150 in favor ofdocument.modelContext. From what I’ve seen, this is new enough that even the naming isn’t settled yet 😅
Building a WebMCP Demo: A Vending Machine an AI Agent Can Actually Use
Okay, we’ve talked about what WebMCP is, but we need to see it in action. Instead of a form, which is what most of the official demos use, I want us to do something a little more playful to properly understand the concept.
Forms are important, sure, but they’re not exactly thrilling to build alongside you.
So, let’s build a tiny web-based vending machine. A grid of snack buttons, a credit balance, and a “dispense” slot.
Don’t worry, it’s nothing fancy on the UI side. I promise, we’re not making this a CSS masterclass (at the same time, I’d never tell you not to go ahead and make it awesome).
The interesting part is what happens underneath 😌
- I’m registering one real WebMCP tool,
buy_snack - I’m testing it with Chrome’s Model Context Tool Inspector Extension, a developer tool that simulates the agent side so I don’t need a real production AI agent to see it work
- I’ll end by talking to my own vending machine in plain English
Rather cool, no? Follow along to build this and see WebMCP actually working.
See the Pen WebMCP in Virtual Vending Machine by Klea Merkuri (@thehelpfultipper) on CodePen.
1. Laying Out the HTML
Let’s start with the actual markup, since everything else builds on top of it.
There’s nothing WebMCP-specific yet, just a grid of snack buttons, a credit display, and a “slot” where dispensed items show up.
<div class="vending-machine">
  <div class="credit-display">
    Credit: $<span id="credit">5.00</span>
  </div>

  <div class="snack-grid">
    <button class="snack-btn" data-snack="chips">🥔 Chips — $1.50</button>
    <button class="snack-btn" data-snack="candy">🍬 Candy — $1.00</button>
    <button class="snack-btn" data-snack="soda">🥤 Soda — $2.00</button>
  </div>

  <div class="dispense-slot" id="slot">
    Nothing dispensed yet.
  </div>
</div>
We have three snacks, three buttons, a credit counter that starts us off with $5.00 to spend, and an empty slot waiting for something to land in it.
I’m giving each button a data-snack attribute so I can tell which snack was clicked later, in the JavaScript (past me thanks present me for that one, trust me).
2. Styling It So It Actually Looks Like a Vending Machine
I want this to feel a little tactile, like a real machine, not just three buttons floating on a page like they’re embarrassed to be there.
Here’s the CSS:
.vending-machine {
  max-width: 320px;
  margin: 2rem auto;
  padding: 1.5rem;
  background: #2b2b2b;
  border-radius: 12px;
  color: #f5f5f5;
  font-family: sans-serif;
  box-shadow: 0 8px 20px rgba(0, 0, 0, 0.3);
}

.credit-display {
  text-align: center;
  font-size: 1.25rem;
  margin-bottom: 1rem;
}

.snack-grid {
  display: grid;
  gap: 0.75rem;
  margin-bottom: 1rem;
}

.snack-btn {
  padding: 0.75rem;
  border: none;
  border-radius: 8px;
  background: #f5c518;
  font-size: 1rem;
  cursor: pointer;
  transition: transform 0.1s ease;
}

.snack-btn:hover {
  transform: scale(1.02);
}

.snack-btn:disabled {
  background: #555;
  cursor: not-allowed;
}

.dispense-slot {
  min-height: 60px;
  background: #1a1a1a;
  border-radius: 8px;
  display: flex;
  align-items: center;
  justify-content: center;
  font-size: 0.95rem;
  color: #aaa;
}
Again, nothing complicated here. We have a dark “machine body,” a grid of gold buttons, and a slot that’s just an empty dark box until something gets dispensed into it.
I’m going to use the :disabled state in a second to show when you can’t afford a snack.
At this point, clicking a button doesn’t do anything yet. Let’s fix that 👇
3. Wiring Up the Regular Click Behavior First
Before touching WebMCP at all, I want the vending machine to work, as in, a human clicking buttons with a mouse.
Getting this right first means having a known-good baseline to compare against once the agent starts calling things too.
let credit = 5.00;

const prices = { chips: 1.50, candy: 1.00, soda: 2.00 };

const creditDisplay = document.getElementById('credit');
const slot = document.getElementById('slot');
const buttons = document.querySelectorAll('.snack-btn');

function dispense(snack) {
  slot.textContent = `Dispensed:${snack}`;
}

function updateButtonStates() {
  buttons.forEach((btn) => {
    const snack = btn.dataset.snack;
    btn.disabled = credit < prices[snack];
  });
}

function buySnack(snack) {
  if (credit < prices[snack]) {
    slot.textContent = `Not enough credit for${snack}.`;
    return false;
  }
  credit -= prices[snack];
  creditDisplay.textContent = credit.toFixed(2);
  dispense(snack);
  updateButtonStates();
  return true;
}

buttons.forEach((btn) => {
  btn.addEventListener('click', () => {
    buySnack(btn.dataset.snack);
  });
});

updateButtonStates();
Remember, this is plain JavaScript, no WebMCP yet. Clicking a button reads its data-snack value, checks whether there’s enough credit, and either dispenses the snack or tells you no.
updateButtonStates() is the piece that actually uses the :disabled styling from Step 2 and runs once up front and again after every purchase, greying out any snack you can no longer afford.
Without that function, the CSS I wrote for .snack-btn:disabled would sit there unused, which is exactly the kind of thing that’s easy to forget when you style a state before you’ve wired up the logic that triggers it 😬
I’ve also had buySnack() return true or false depending on whether the purchase went through. That return value isn’t used anywhere yet, but hang onto it because it’s about to matter.
Tip 👀
I pull the actual purchase logic into abuySnack()function on purpose, because that’s the exact function I’m about to hand over to an AI agent in the next step. Instead of writing separate logic for a human clicking versus an agent calling, I want one function that both paths share.
4. Checking Whether the Browser Even Supports WebMCP
Before registering anything, let’s check whether modelContext exists on document at all:
if ('modelContext' in document) {
  registerVendingTool();
} else {
  console.log('WebMCP not supported in this browser yet.');
}
Don’t forget to do this! It matters because, right now, this only works in Chrome 149+ with either the local flag enabled (chrome://flags/#enable-webmcp-testing; you’ll need to relaunch for changes to take effect) or an origin trial token registered for production.
Anyone visiting on another browser won’t see any of this happen. The vending machine still works fine by hand; it just won’t respond to an agent.
That’s exactly why WebMCP is designed as a progressive enhancement, not a requirement.
5. Registering buySnack() as a Real WebMCP Tool (One Function, Two Callers)
At this point, I was wondering if the agent path needs its own separate version of the purchase logic, one that returns a string instead of updating the DOM. Since, you know, it needs a structured response whereas a click acts.
Or can we use one function for both?
I opted for one function which should do the job just fine (if we set it up right). After all, in production applications, you’re not going to be duplicating logic just to enable WebMCP capabilities 😌
Here’s the registration:
function registerVendingTool() {
  document.modelContext.registerTool({
    name: 'buy_snack',
    description: 'Purchase a snack from the vending machine by name. Requires enough credit.',
    inputSchema: {
      type: 'object',
      properties: {
        snack: { type: 'string', enum: ['chips', 'candy', 'soda'] }
      },
      required: ['snack']
    },
    execute: async ({ snack }) => {
      const success = buySnack(snack);
      if (!success) {
        return `Not enough credit for${snack}. Add more credit first.`;
      }
      return `Dispensed:${snack}. Remaining credit: $${credit.toFixed(2)}`;
    }
  });
}
Notice execute() doesn’t reimplement the purchase logic. Instead:
- It calls the same
buySnack()function my click handler calls in Step 3 - Checks the
true/falseit returns - Translates that outcome into a sentence an agent can read back to whoever asked for a snack
That’s the actual difference between the two paths:
- A human clicking gets a visual update (the slot text changes, a button greys out).
- An agent calling
execute()gets a string back, because agents don’t watch a screen. They read whateverexecute()returns and pass it along as a reply.
Same underlying math and state, two different response formats layered on top.
This also means there’s only one place a purchase bug can hide. If I’d written the credit-checking and deduction logic twice (once for clicks, once for execute()) I’d have to remember to fix both, in the same way, every time.
One shared function means I only maintain one set of rules for what counts as a valid purchase.
The enum on snack does the quiet work of telling the agent exactly which values are valid, so it’s not left guessing whether “Coke,” “soda,” or “a drink” is the right string to send.
Note 📍
Don’t forget thatupdateButtonStates()already runs insidebuySnack()so callingbuySnack()fromexecute()keeps the buttons in sync automatically, no matter which path spent the credit. That’s the payoff of sharing one function instead of two: I don’t have to remember to sync state twice.
6. Confirming the Tool Actually Registered
Agents don’t blindly call things. They can ask a page what’s available first, using getTools().
I use this to sanity-check my own work while building:
document.modelContext.getTools().then((tools) => {
  console.log(tools);
});
Or, utilize the handy WebMCP pane under DevTools → Inspect → Application.
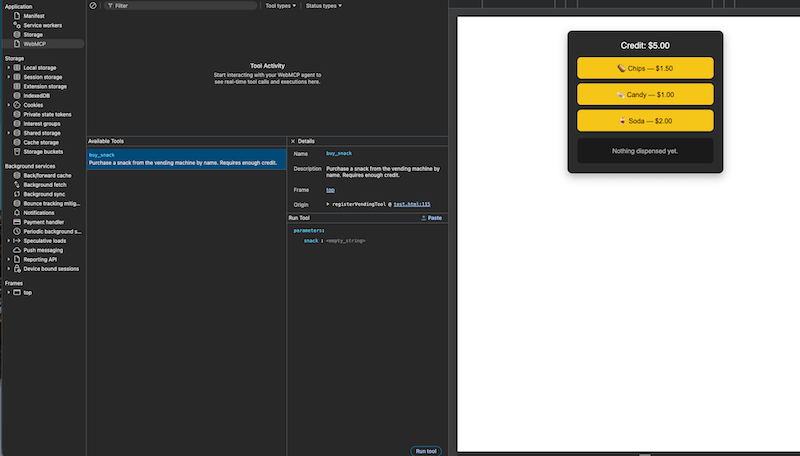
If buy_snack shows up in that list with the right schema attached, the registration worked.
Tip: Worth keeping this one-liner around even after you’re done building since it’s how you’ll debug a tool that isn’t showing up where you expect.
7. Testing It With the Model Context Tool Inspector Extension
Now, do you need this extension for WebMCP to actually work? No. The extension is a developer tool, not a requirement.
Once a tool is registered on a page, any WebMCP-aware agent can call it, no extension involved.
What the extension gives me, right now, is a way to test that without waiting for a real production agent to exist, since almost none do yet (more on that later in this post).
The extension does two things:
- It lists every tool currently registered on the page you’re viewing, so you can confirm your schema looks right without digging through the console.
- If you provide your own Gemini API key, it lets you type a natural-language prompt into a little panel and watch it decide which tool to call and with what arguments, exactly the way a browser-based agent eventually will.
With the extension installed, I open the demo page and type something like “get me something salty” into the inspector’s prompt box.
Watch it correctly call buy_snack with snack: "chips", no clicking involved. No cursor moving. Nothing.
Just chips, dispensed, like the machine read my mind 🙌
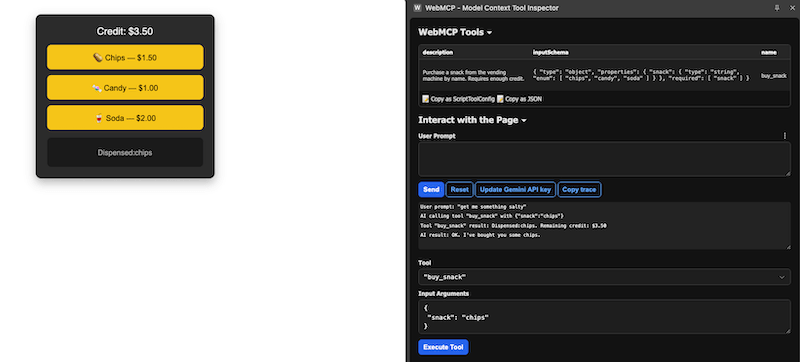
Seeing the schema, the natural-language prompt, and the actual function call line up like that is honestly the moment this whole concept stops being abstract for me.
The button never gets clicked. The agent goes straight to the function I wrote in Step 5, the same one my own click handler from Step 3 calls.
Same machine, two completely different ways of talking to it.
What Happens When There Are Two Salty Snacks Instead of One?
Here’s the thing though, “get me something salty” only worked because chips are the only salty thing in the machine. That’s a little too easy. Of course the agent got it right. It didn’t have a choice.
So I made myself ask the harder question: what if I added pretzels and popcorn? Both are salty.
Now “get me something salty” doesn’t have one obvious answer, and as it turns out, I can’t fix that inside execute().
Why? Because by the time execute() runs, the agent has already picked a snack and told me which one. The moment where it decides is earlier than that, and it never touches my code at all.
That was a weird realization since I’m used to bugs living in the function. This one lives in the description.
So how do you actually debug that?
Here are a few things I’d try, based on what Chrome’s own guidance points at:
- Stop leaning on a bare
enumof names and start giving each snack a little context to work with. Something like “chips: salty, crunchy” and “pretzels: salty, low sugar,” so there’s more than just a name to match “salty” against. - Tighten the tool’s own description. Right now it just says “purchase a snack by name,” which quietly invites the agent to pick one if it’s unsure. Something closer to “purchase a snack by its exact name” makes it clear that vague requests aren’t its call to resolve alone 🙅♀️
And honestly, the best fix might not be code at all. Instead, it’s whether the agent asks.
A well-built agent, faced with two matches and no clear winner, should come back with “did you mean chips or pretzels?” instead of guessing.
WebMCP can’t force that behavior, but a clearer schema makes it much more likely to happen.
What this taught me, in the middle of building a glorified vending machine, is that a WebMCP tool isn’t “done” once execute() runs correctly. It’s done once the description gives the agent enough to work with before it ever gets there.
My three-snack machine is small enough to completely hide that problem. A real one wouldn’t get off that easily.
Explore: A Smart Free Chrome Extension That Upgrades AI Prompts
Skipping the Extension: Calling WebMCP Tools From Cursor Directly
The Inspector Extension is great for testing, but it does ask for a Gemini API key, which not everyone has lying around to poke at a demo.
If that’s you, there’s actually a more direct route, and it happens to be one I only found while double-checking my own facts for this post.
There’s a small open-source project called MCP-B that bridges WebMCP tools straight into desktop MCP clients like Cursor, Claude Desktop, and Claude Code.
Hey! It’s not something Chrome ships or documents. It’s a separate, community-built layer sitting on top of standard WebMCP registration, so treat it as an ecosystem add-on rather than part of the spec itself.
The way it works is refreshingly simple once you see it.
Your page registers tools exactly the way I did in Step 5; nothing changes there.
A small relay runs on your machine and listens on a local WebSocket.
Your browser tab connects to that relay, and the relay turns around and presents itself to Cursor as a completely ordinary MCP server.
Cursor doesn’t know or care that the tools underneath came from a browser tab instead of a database.
Setting it up is one block in your Cursor MCP config:
{
  "mcpServers": {
    "webmcp-local-relay": {
      "command": "npx",
      "args": ["-y", "@mcp-b/webmcp-local-relay@latest"]
    }
  }
}
Open a tab with WebMCP tools running, and they’ll show up in Cursor’s tool list. No extension, no API key, no separate agent to configure.
Cursor supplies the reasoning itself, the same way it would for any other tool you’d wired up.
Note 🤓
I came across some numbers floating around claiming huge token savings and near-perfect accuracy for this approach over DOM scraping. I went looking for where those actually came from and couldn’t trace them to a real source, so I’m leaving them out here. The mechanism itself checks out but I don’t want to hand you a stat I can’t back up.
What I like about this path is that it makes the whole “the agent inherits your session” idea from earlier in this post concrete in a totally different tool.
Whatever cookies and login state are active in that browser tab, Cursor gets access to through the same tab, not through some separate login flow it has to manage on its own.
WebMCP Security: What’s Actually at Risk (And What’s Not)
Is any of this actually risky? Short answer: it’s more locked down than it might sound at first, but it’s worth understanding why with actual examples, not just the general shape of the rule.
Because WebMCP runs inside your actual browser tab, it inherits whatever session is already active there, things like cookies, login state, etc.
That’s the same access level you’d have clicking around yourself. It’s not a separate, less-trusted context.
If you’re logged into your bank in that tab, an agent using WebMCP tools on that page has the same session you do, same as if you’d clicked around yourself.
And that’s exactly why there are two built-in layers of gating.
Origin Isolation Keeps Tools Tied to One Origin
Say parent.example.com embeds an iframe from video.example.com. Both share the same root domain (example.com), just different subdomains.
Older, riskier browser behavior let a page loosen its own boundaries by setting document.domain, which would let those two subdomains treat each other as if they were the same origin, sharing access they normally wouldn’t have.
WebMCP refuses to run at all if that relaxed mode is active.
If a page has document.domain enabled (usually via the Origin-Agent-Cluster: ?0 header), its WebMCP APIs get disabled outright, no tools registered, nothing.
Basically, a tool’s identity is tied to the origin it was registered under, and if that origin’s boundary can shift mid-session, there’s no way for the browser to guarantee which site is actually answering when an agent calls a tool.
So instead of trying to handle that safely, it just doesn’t run there at all.
This is exactly why a bigger, older site (one still using shared subdomains for legacy reasons) might find WebMCP won’t turn on until that pattern gets cleaned up.
The Permissions Policy Blocks Cross-Origin Tools By Default
Now, say your site embeds a third-party widget in an <iframe>, something like a chat plugin or an ad unit from a different origin entirely. By default, that embedded iframe:
- cannot register its own WebMCP tools on your page
- cannot call any tools your page has registered either
The only way around that default is for your page on purpose explicitly adding allow="tools" to that specific iframe.
Without it, an embedded third party has no way to quietly sneak in a tool that an agent might call, and no way to trigger one of yours either.
My demo efforts on CodePen are a perfect example for you:
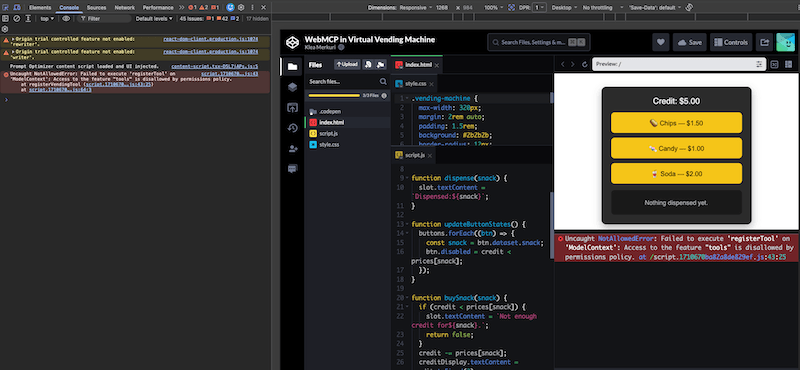
Unless you deliberately open the door for a specific embedded frame, nothing outside your own origin can touch your tools, register new ones, or get called by an agent operating on your page.
So nothing here is wide open by default. A site has to opt in, the browser has to allow it, and for anything sensitive, Chrome’s own docs mention you can route the action through a confirmation dialog before it actually executes.
Tip 💬
The confirmation dialog is helpful if you’re the one deciding what to expose as a tool on your own site. Don’t register anything you wouldn’t want an agent, or, frankly, anyone with access to that tab, to trigger without a second check.
Related: The Privacy Tools You Trust Aren’t Doing What You Think
Using WebMCP and MCP Together (Yes, You Can)
Chrome’s docs describe the following pattern:
- Let your MCP server handle the core logic such as background tasks, database calls, anything that needs to work regardless of which browser or device someone’s using.
- Use WebMCP as the contextual layer on top of that, giving an agent a fast in-browser way to act on what’s currently on screen.
Honestly, this is probably how most real implementations end up working.
Tip: MCP is the backend brain, WebMCP is the hands that can touch what’s actually in front of the user right now.
Why WebMCP Has a Live Origin Trial and Almost No Adoption
Well, here’s the part that made this post worth writing in the first place. Let’s take a look at why we aren’t hearing much about this.
The Supply Side: Big Names Are Experimenting, Not Shipping
Google has named several companies like Shopify, Etsy, Instacart, TurboTax, Expedia, Booking.com, Credit Karma, Redfin, and Target as participants experimenting with WebMCP during the origin trial.
That’s a real, credible list.
But “experimenting during an origin trial” and “shipped this to production users” are two very different things, and right now, that’s most of what’s happening on the supply side.
The Demand Side: Almost Nothing Is Calling These Tools Yet
Registering a tool doesn’t do much if nothing’s calling it, and that’s the actual bottleneck right now.
As of the most recent reporting I found while researching, Gemini in Chrome is the one confirmed agent that will consume WebMCP tools directly. Even this integration is still described as “coming soon,” not fully live.
Claude, ChatGPT, and other browser-facing agents aren’t calling modelContext tools yet.
So I’m building a whole vending machine tool for an audience that’s currently one browser assistant that hasn’t fully turned the feature on. Which is a little like setting up a lemonade stand on a street where the only person who might walk by hasn’t moved into the neighborhood yet 🤦♀️
However, it’s also exactly why building this now feels worth it. The entire API surface is small enough to learn in an afternoon, and understanding the mental model now means I’m not starting from zero whenever the demand side actually catches up.
Note ⚠️
WebMCP also isn’t on the formal W3C standards track yet. It’s currently a Draft Community Group Report, and the API shape is still actively changing. Thenavigator.modelContext→document.modelContextrename happened within weeks of the origin trial opening. If you’re building with this today, expect things to shift under you.
Explore: You Need To Work Smarter, Not Harder, With AI
How to Start Testing WebMCP Today
These are your next steps, in order of effort:
- Enable
chrome://flags/#enable-webmcp-testinglocally to experiment on your own machine, or sign up for the origin trial if you want to test on a live production site. (Or, be on the latest Chrome version… I guess, I certainly didn’t enable anything.) - Install the Model Context Tool Inspector Extension and poke around any WebMCP-enabled page, including the demo from this post once it’s live. (Or, use Cursor or your IDE of choice and the relay.)
- Look at Chrome’s own official demos for a bigger example than mine. The WebMCP Pizza Maker (Imperative API), a React-based flight search demo (Imperative API), and a “Le Petit Bistro” demo (Declarative API) all live in Google’s
webmcp-toolsGitHub repo.
It’s a Wrap
Building this makes me realize WebMCP isn’t really an “AI feature” so much as it’s a validation contract that happens to also serve a robot 🤖
The JSON Schema I wrote for buy_snack is functionally the same discipline as writing form validation for a human user. The main difference is that I also got an agent to understand it for free.
Turns out being thoughtful about your data shapes pays off in ways you don’t expect.
If you get the vending machine demo running yourself, I’d like to know: what’s the weirdest tool you’d register on your own site? I’m curious what THT-ers come up with here.
Keep exploring!


